![]()
Last update: 2020-10-15
Application Version 2.3.0.x
| Hardware | Processor: 4 threads, 2.0 GHz 16 GB of RAM 10 GB of free hard drive space per container |
|
| Software | Windows 7/10, 64-bit .NET Framework 4.6.2 |
|
| Internet connection | Internet connection on ports 80 and 443 (http/https traffic) to the address rtkapi.br-ag.eu. |
http://standards.iso.org/iso/17442; see http://codes.eurofiling.info/ for referenceUser can install application by clicking on an installer, e.g. "Particles_2.0.1.X.exe".
User can specify where Atome: Particles will be installed. Installer will create a new folder, e.g. "Particles_2.0.1.X" with Atome: Particles application inside the provided directory.
After successful installation the new folder will contain all installed files.
Each update will be distributed by BR-AG Team to all clients by e-mail and needs to be installed manually by users as mentioned above.
If a new version of the software appears, the user should download it from the website (https://br-ag.eu/products/atome-particles/download/) then unpack and run it.
The folder with the previous version of the ATOME: Particles, can be removed. Deleting a folder with a previous version of the tool isn't necessary but recommended.
User can launch application by clicking "Particles.exe" in the installation folder.
In case of first launching see section First launch. Otherwise please see section Containers.
Upon first launch user is asked to provide the license file (with a extension *.license). The license file itself contains all the information about supported package which allows for offline use of the software.

The license file can be downloaded from: https://br-ag.eu/products/atome-particles/download-license/. After providing the license key there a particles.license file will automatically start downloading, that then can be used to activate the application.
Important: the application will always refer to the licensing file while it's in use, so make sure that the file is always accessible by the application itself, if the file is not accessible or missing, the application will ask the user to point to another one.
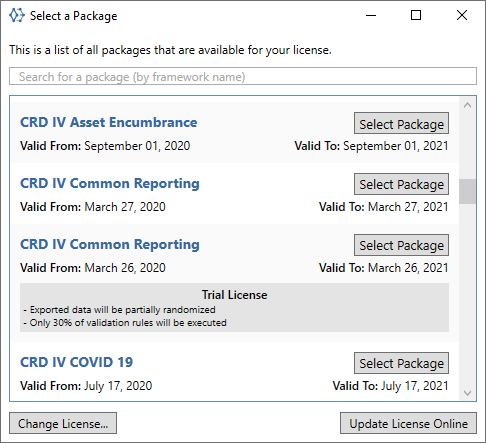
After a successful activation and every time Atome: Particles application is launched, the user will be presented with a package selector window.
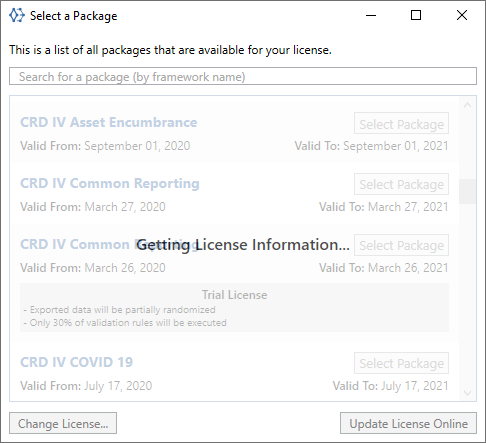
Important: The window might take a couple of seconds to update the appropriate packages for the user's license, if there is a internet connection, if the application can't contact the licensing server it will read the contents of the licensing file, so it can be used offline
This window shows all important parameters about a particular package:
After selecting a package, the user will be able to create/open containers for a particular reporting framework. If a package is greyed out, it means that at least one of following conditions is met:
The particular reason will be displayed on the package.
Underneath the list of packages there are two buttons:
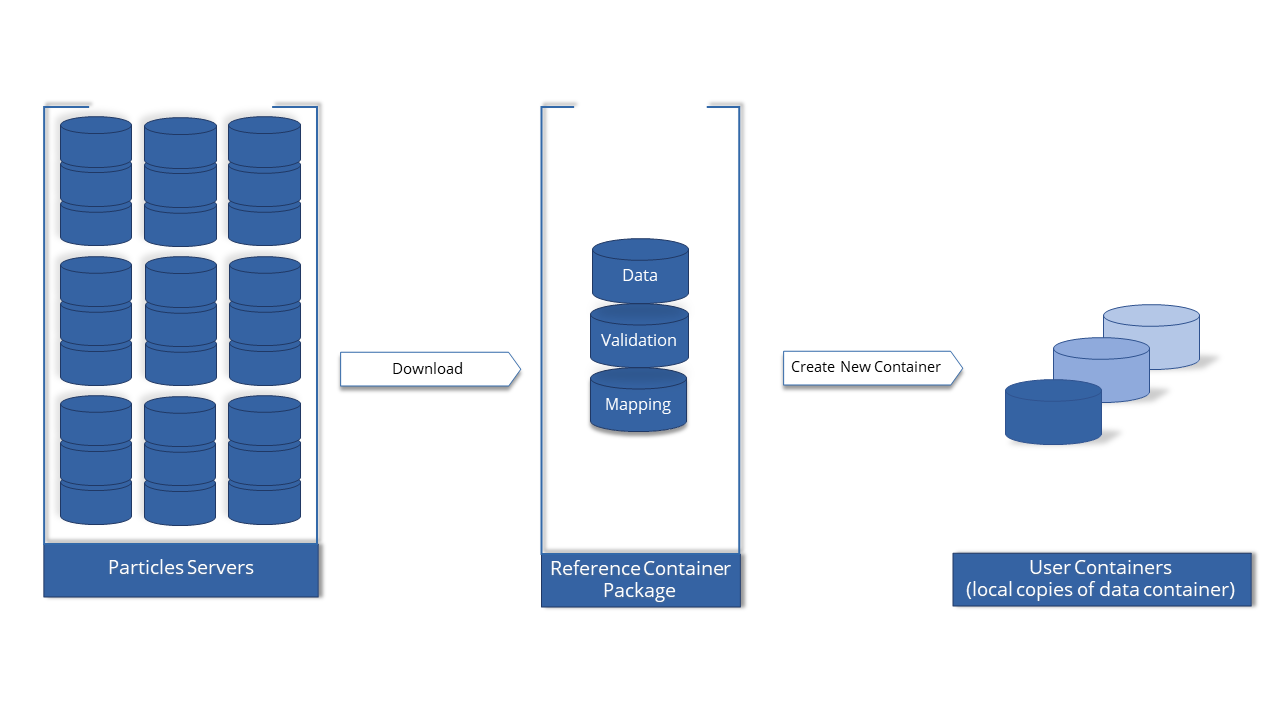
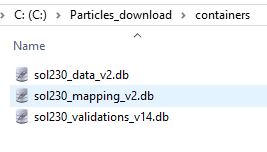
Master containers hold metadata with each version of a reporting obligation. These are for example "Solvency II 2.0.1", "Solvency II 2.1.0", "Solvency II 2.2.0", "Pension Funds 2.1.1 PWD", "CRDIV 2.6", "CRDIV 2.7", etc.
After successful selection of the package (see section Select a licensing package), it will request user to select folder to store master containers. User can select default location to store containers and click "OK".
Following steps are described in section First launch.
Path to master containers can be also defined in the "Settings" menu bar, "Download" tab.
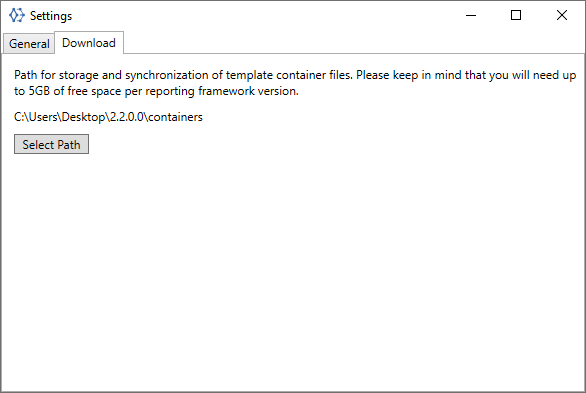
This path shall point to a folder containing folder "ContextAddressMappingDatabase" and "Database".
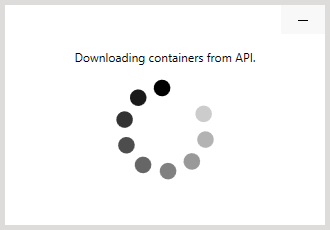
The application will automatically download the needed container when the user tries to create or open a container. The user will be prompted about the download.
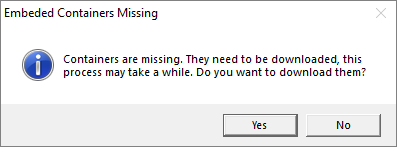
This one-time process can take a few minutes depending on Internet connection.
ATOME: Particles sets the default currency according to the user regional settings. In case when the User wants to change the currency, it is possible in Settings/General


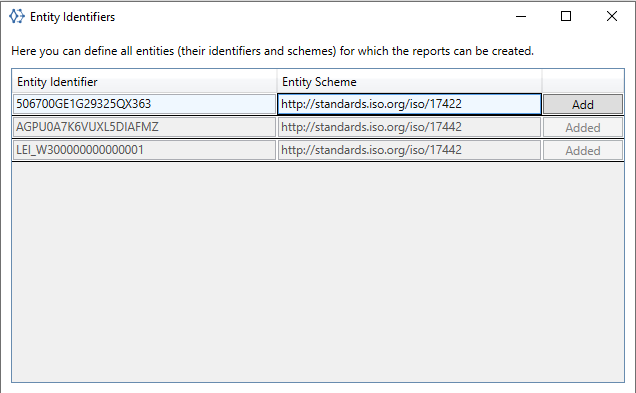
Atome: Particles allows to load data and create reports for a number of reporting entities as per the licence purchased. The list of entities can be managed by selecting "Entity Identifiers" in "Settings" in the menu bar.
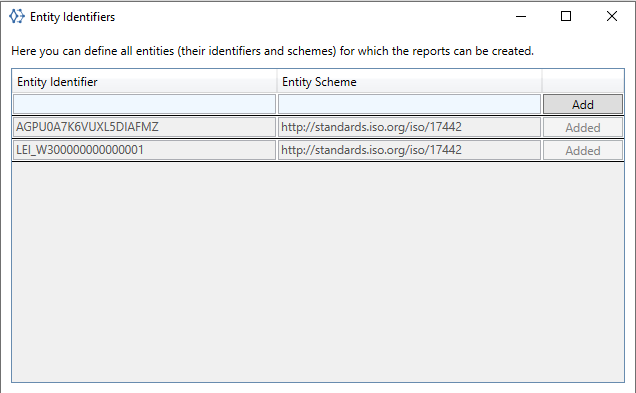
Reporting entities can be defined by providing "Entity Identifier" and "Entity Scheme" as per filing rules or other guidelines provided by a regulator. For example, requirements set up by EIOPA are defined in the filing rules (e.g.https://dev.eiopa.europa.eu/Taxonomy/Full/2.1.0/EIOPA_XBRL_Filing_Rules_for_Solvency_II_reporting_2.1.0. pdf) section "III.6. Reporting entity".
From the version of application Atome: Particles 2.0.0 it is possible to add Entity Identifier during import process. Depending on the type of file imported, it is carried out in the following steps:
The process of importing a file in XBRL format is described in section Import from XBRL.
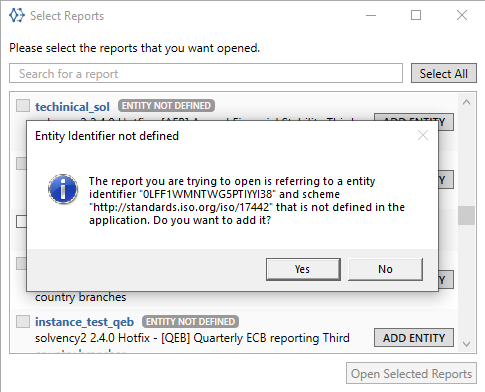
If the Entity Identifier and Scheme will not be registered before, after selecting the file in XBRL format and pressing "Next" information about possibility of adding new Entity and Scheme will be displayed.
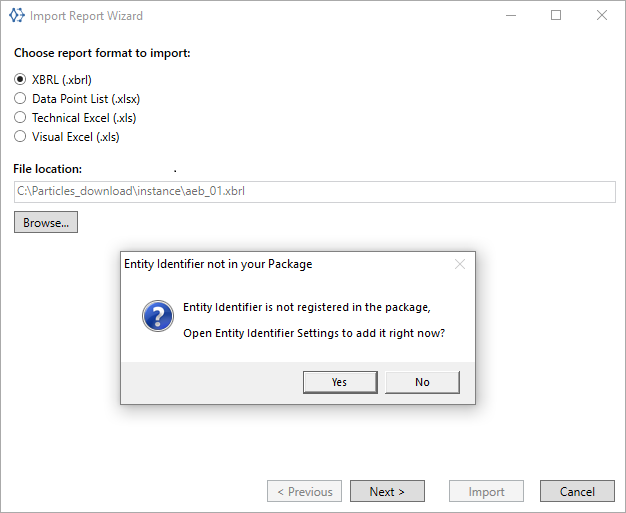
New Entity Identifier and Scheme will be provided to Entity Identifier list.
In the
Entity Identifierwindow that presents itself while adding an Identifier and Scheme directly from a XBRL report the user can't make any changes. To manually add additional Identifiers go toSettings/Entity Identifiers
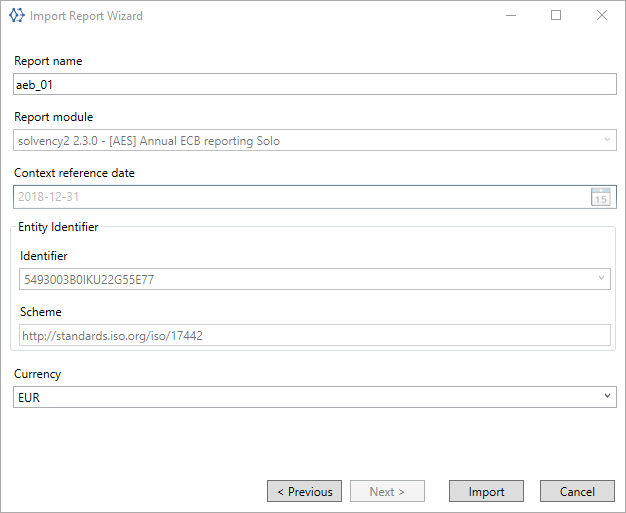
After confirming the adding new Entity Identifier and Scheme, will be displayed Import XBRL Window.
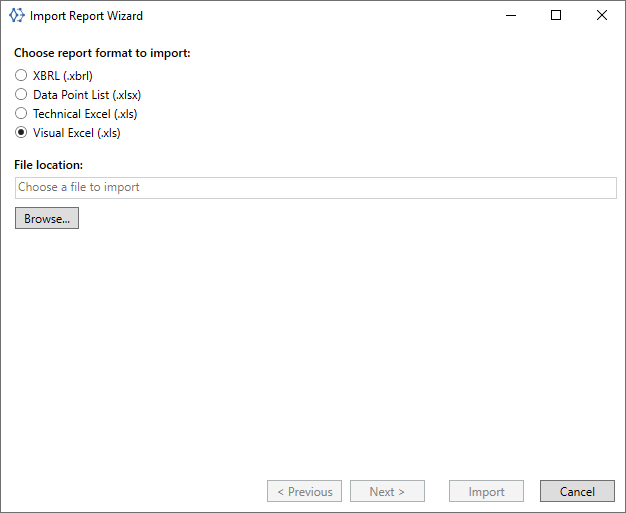
After choosing file in Visual or Technical Excel format and following to the next step the user has the possibility to manage identifiers.
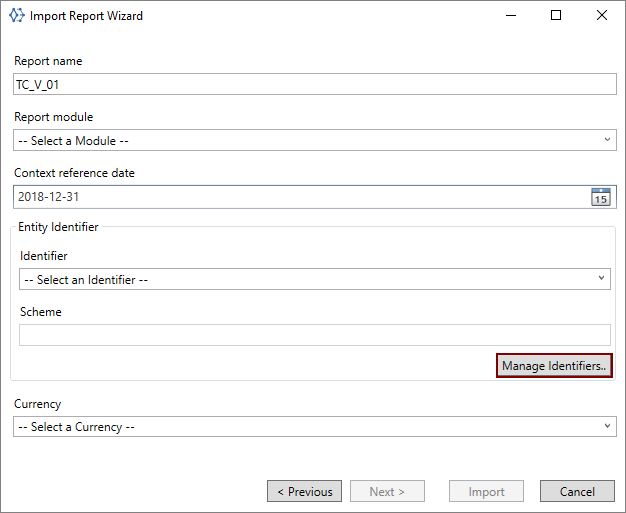
After pressing "Manage Identifier" button, Entity Identifier Window will be opened. In this case Entity Identifier and Schema must be entered manually.
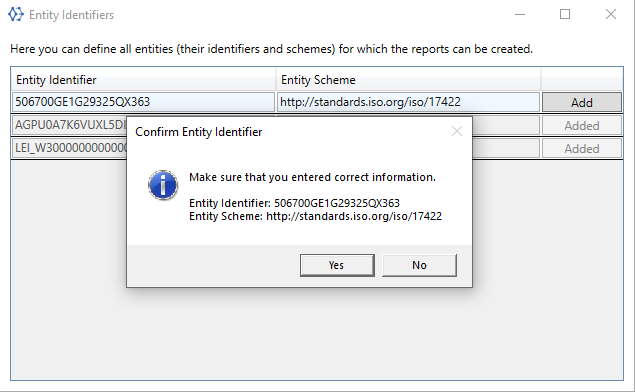
From here User can add a new Entity Identifier. For this purpose the User should press "Add Entity" button to confirm entering data.
In the next step the User will be asked to confirm of adding new Entity Identifier and Scheme.
From here User can add a new Entity Identifier. For this purpose the User should press "Manage Identifiers..." button and a Entity Identifiers window will open.
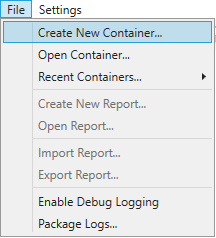
In order to create a new container to store reports, select "File" in the menu bar and then "Create new container".
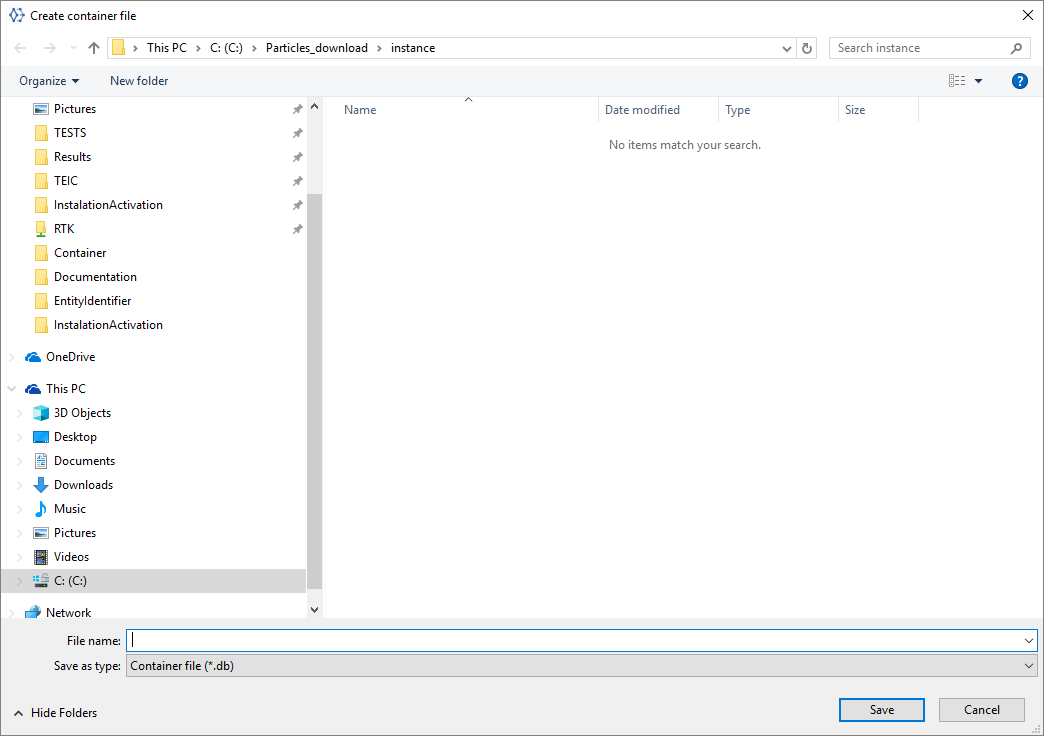
In order to select the location of the container by clicking on "…".
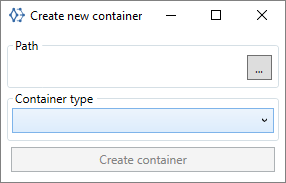
Select location and container file name and click "Save".
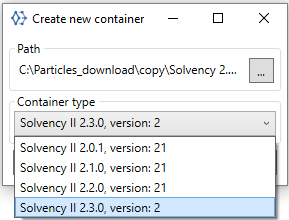
Select container type by identifying version of the reporting requirements.
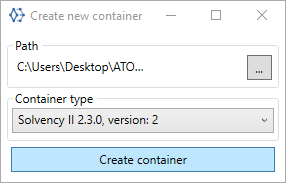
Confirm by clicking "Create container".
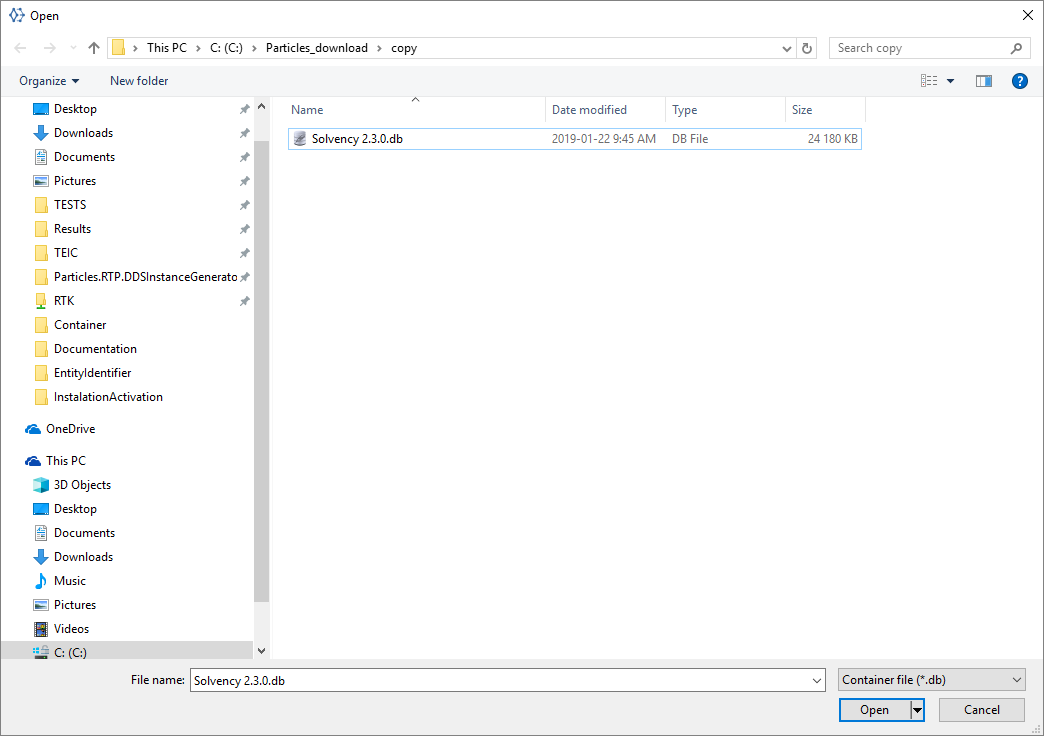
In order to open the existing container, select "File" => "Open container" from menu bar
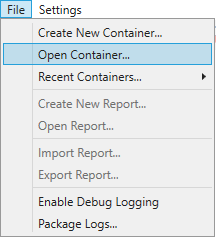
Select container file and click "Open".
The function displays the path of the last 5 opened containers.
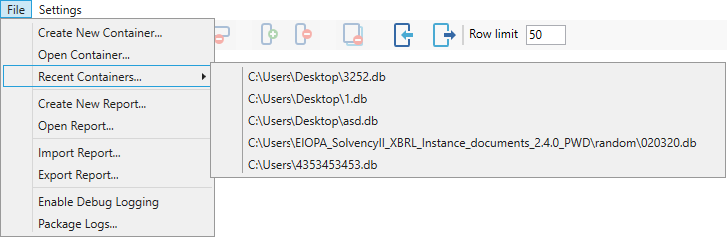
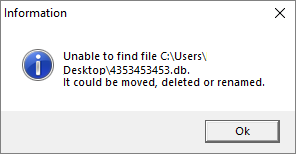
When the user tries to open a container that is no longer located at that path, the following message will be displayed:
Reports can be created or opened once the container is set up or selected (see section Containers).
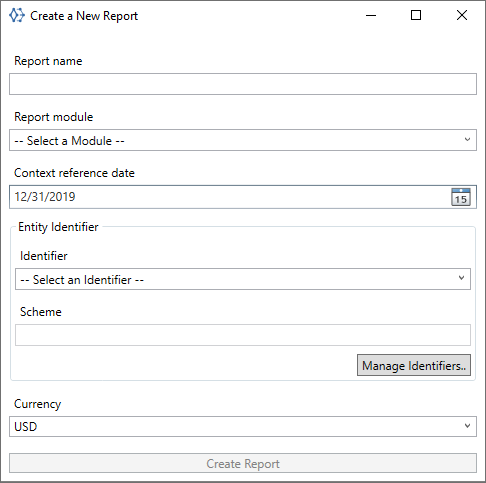
In order to create a new report, go to "File" => "Create new report".
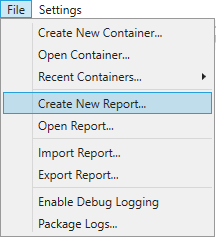
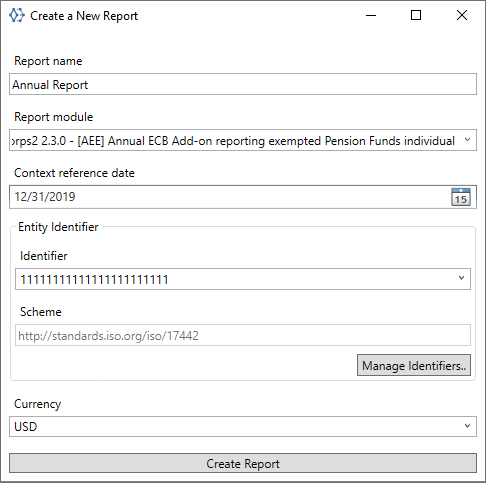
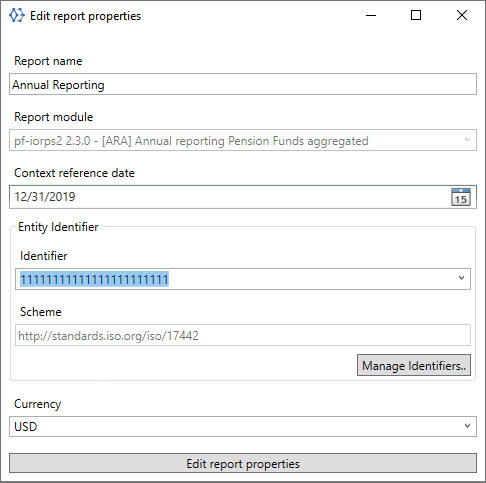
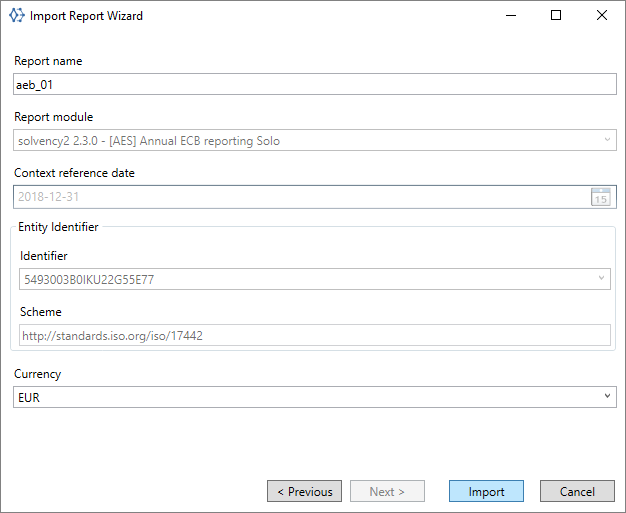
Report information can be set up upon creating new report or editing report information. Reports are distinguished by their name defined by users.

Report contains data for a reporting scenario (module) as defined in the reporting requirements for a given container. User select the module from a dropdown list.
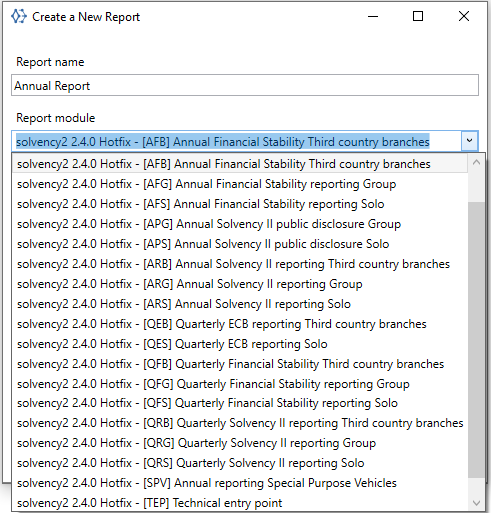
User sets reporting date (default date is the end of nearest previous quarter), selects reporting entity (for definition of reporting entities see section 3.6), selects reporting currency and clicks "Create new report".
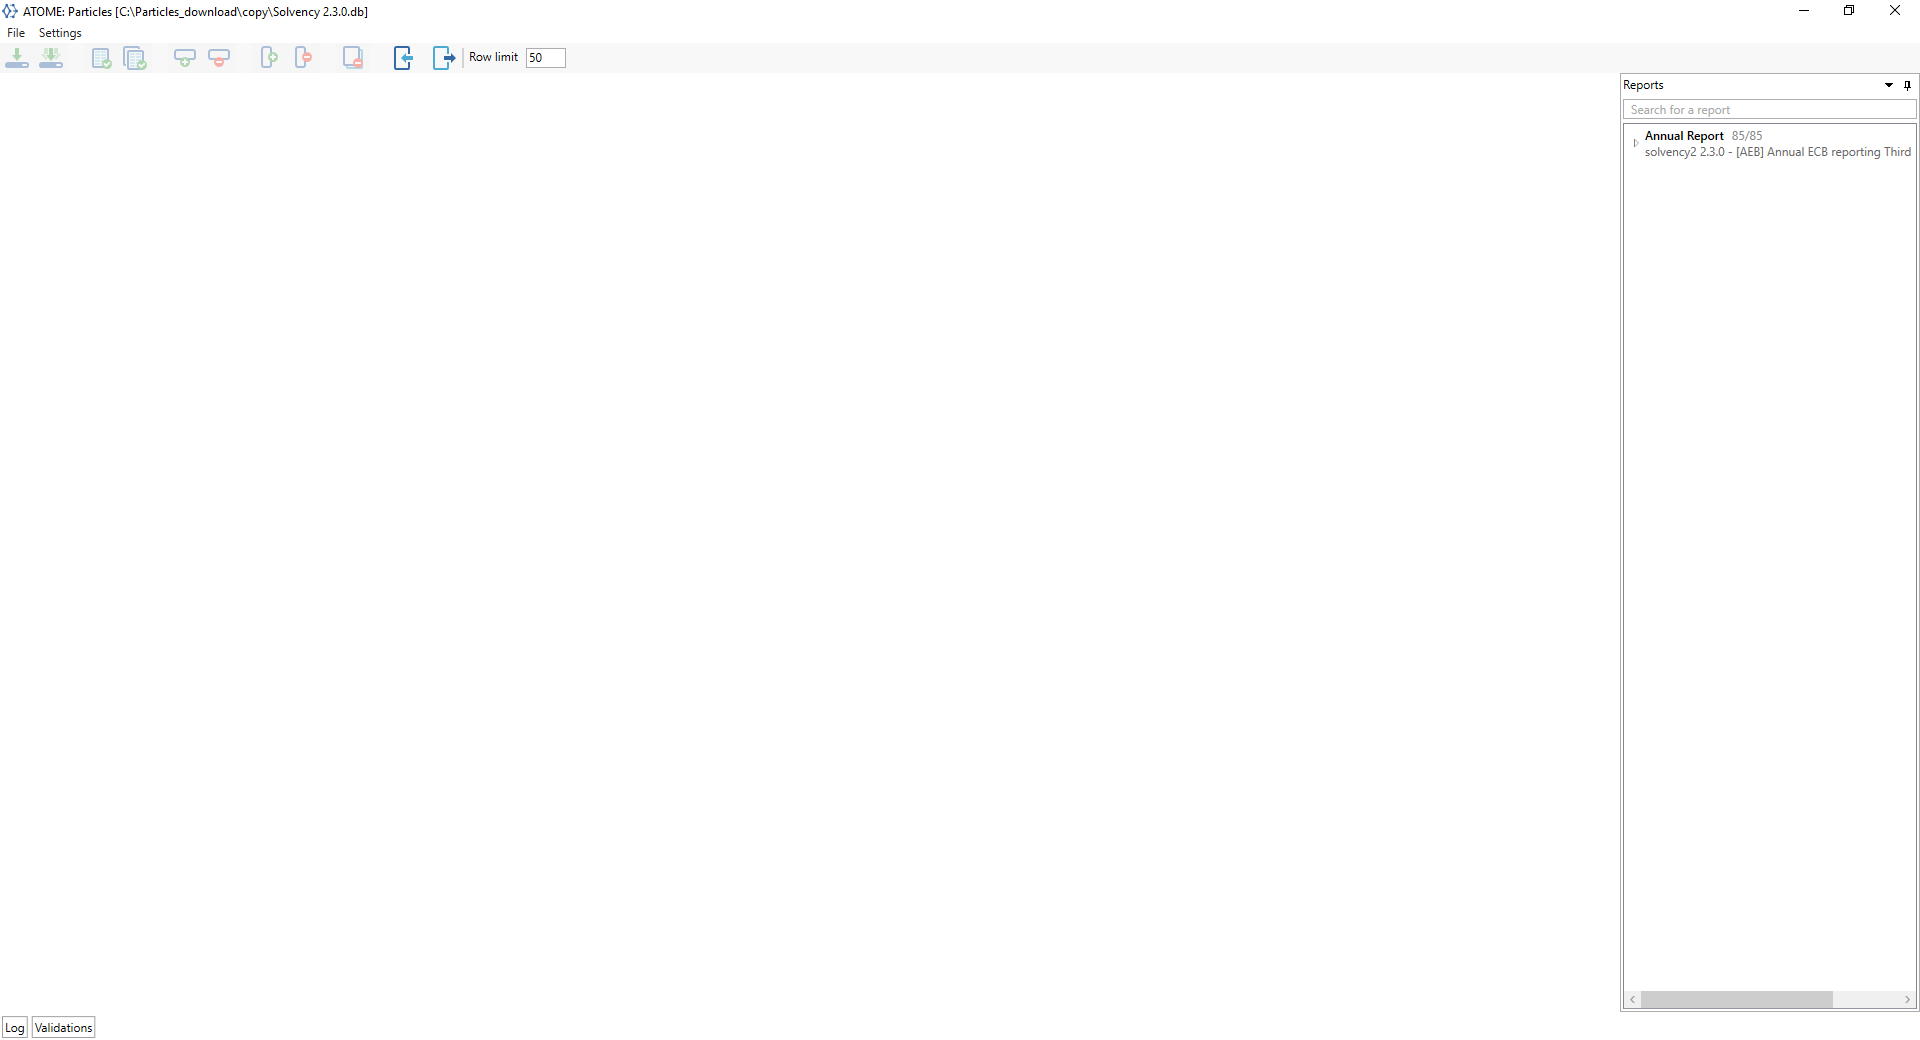
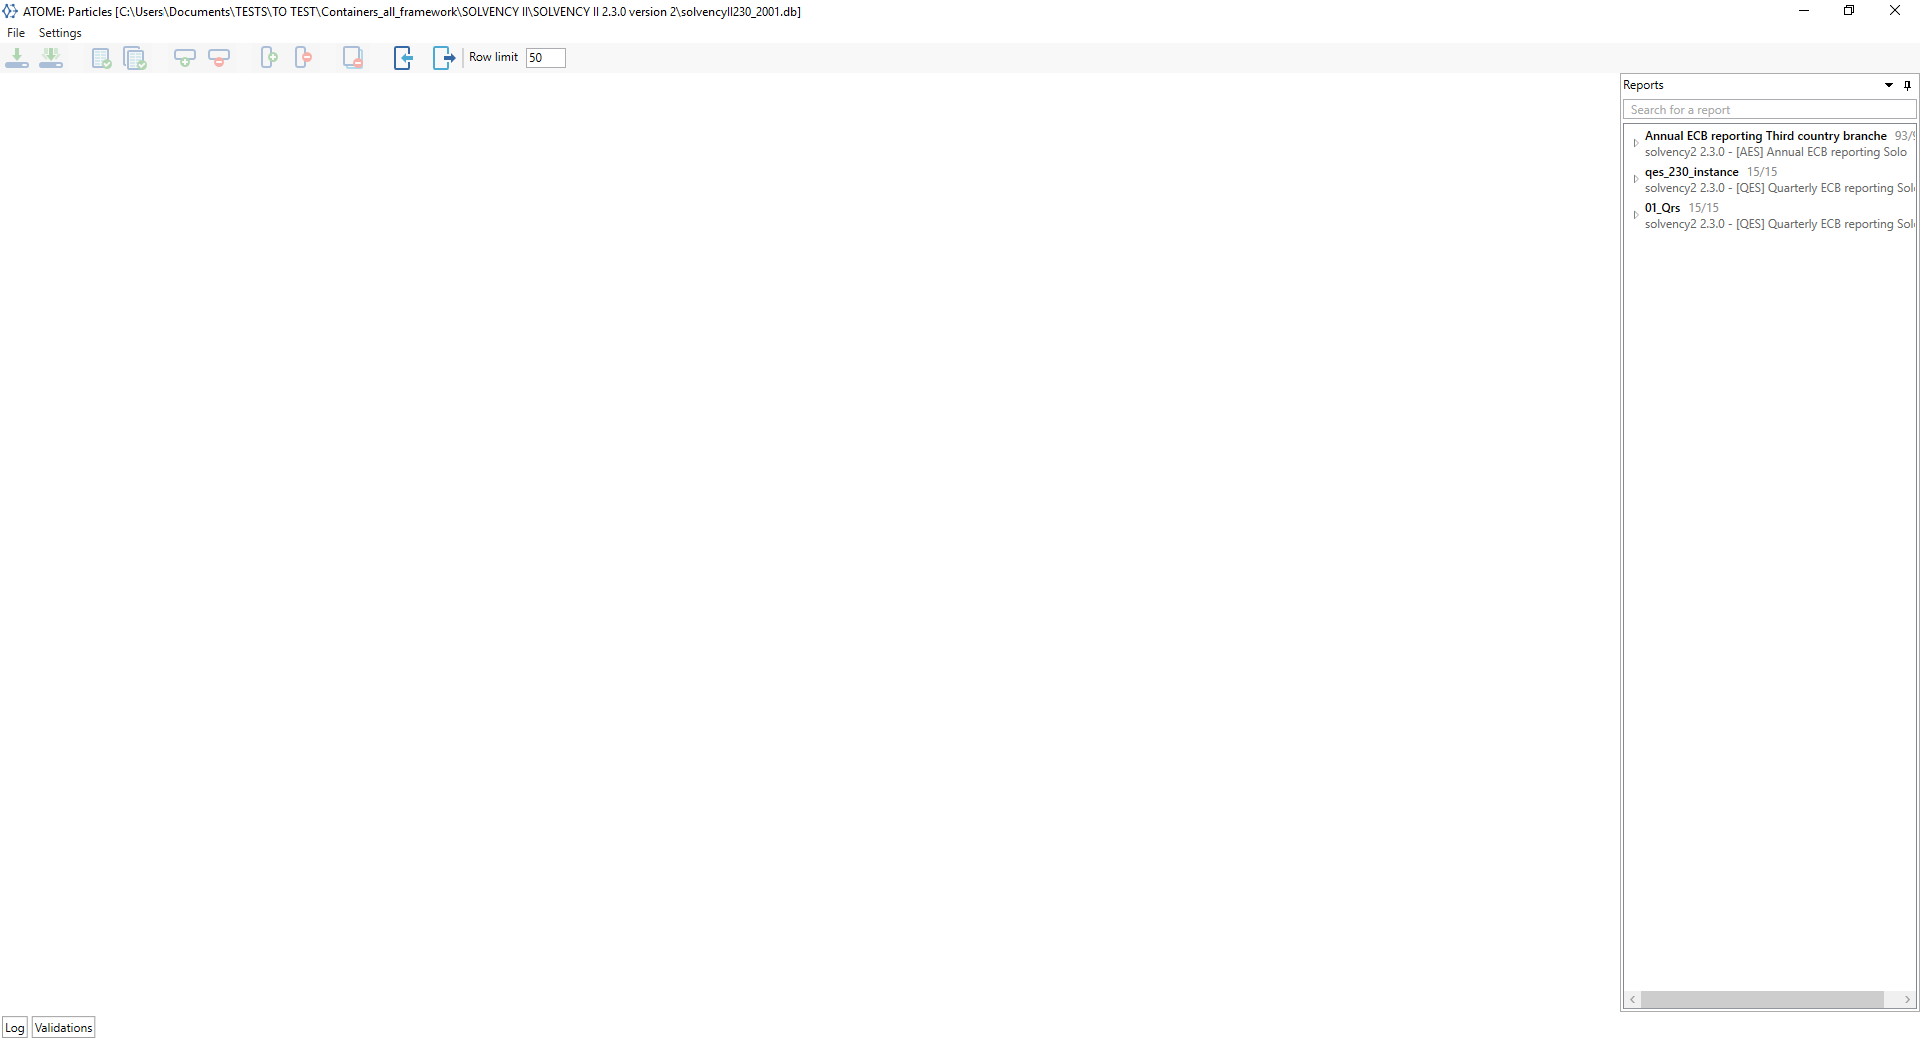
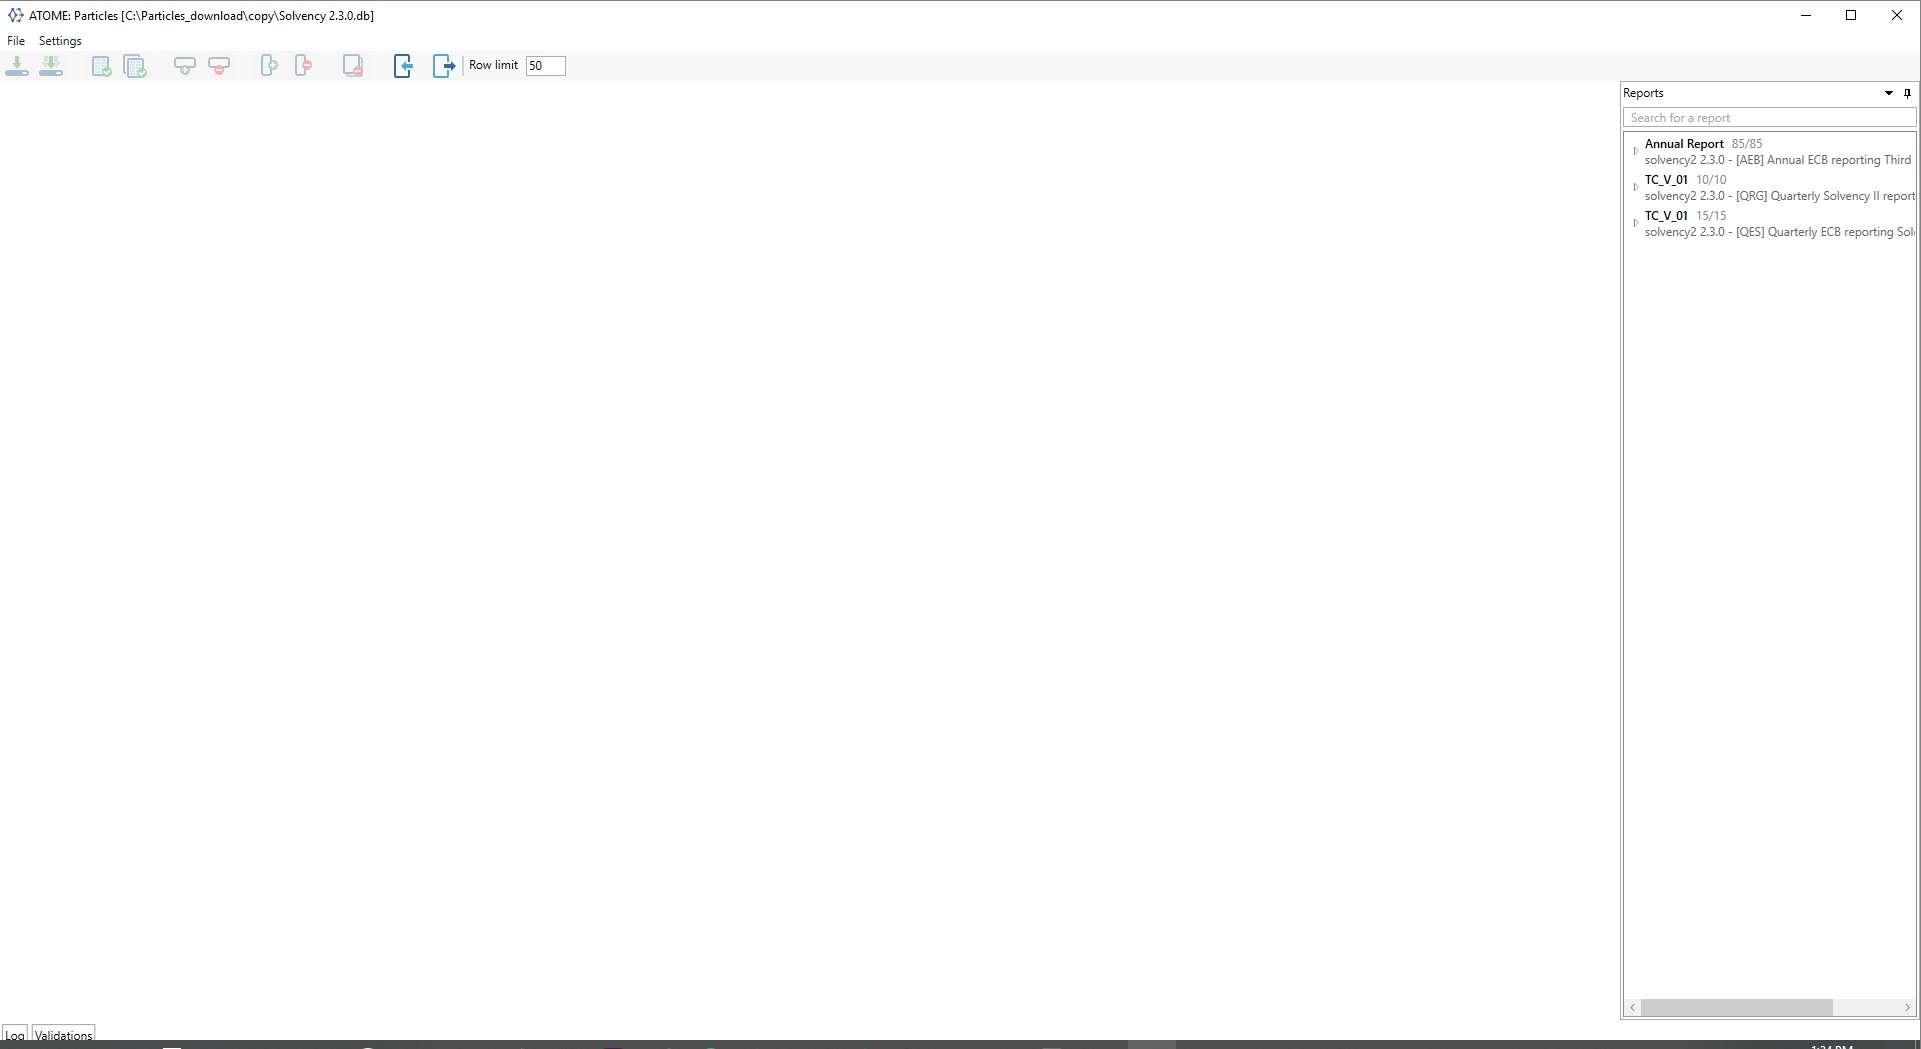
Created report will be listed in the "Reports" window pane on the right hand side.
In order to open report select "File" => "Open report" in menu bar.
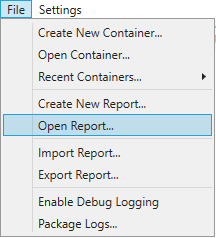
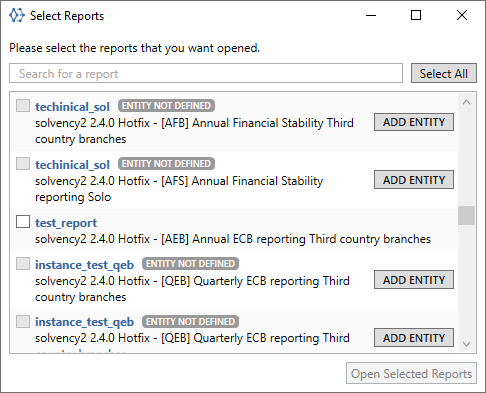
After creating container, opening container or selecting "Open report" (see section 5.3) application prompts user to select one or more reports to be opened.
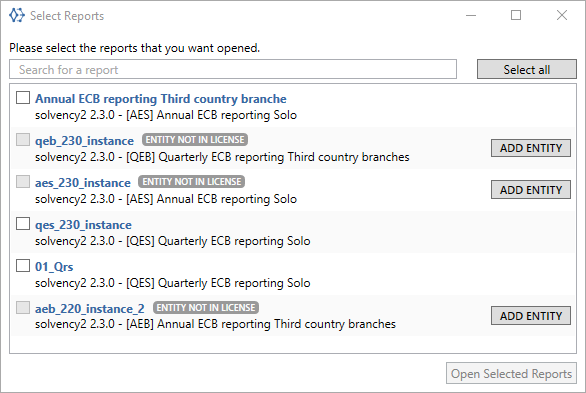
Select reports to be opened and click "Open Selected Reports". Opened reports will be displayed in the "Reports" window pane on the right hand side. From here User can add a new Entity Identifier. For this purpose the User should press "Add Entity" button to confirm entering data.
User can close a report by deselecting it from the list as described in section Select report to be opened.
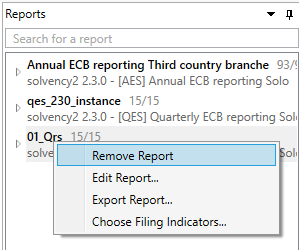
In order to edit report information right click on a report in the "Reports" window pane on the right hand side and select "Edit report".

Following steps are described in section 5.2. Dropdown allowing selection of modules is disabled for edition.
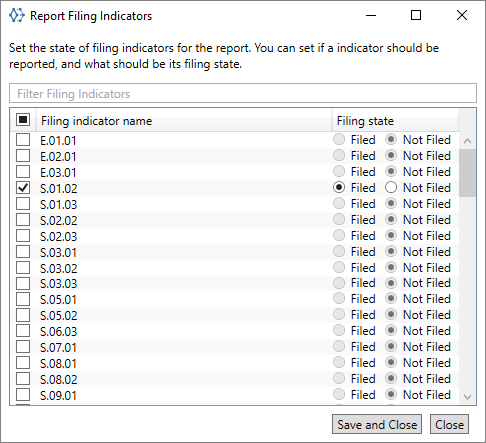
The user can choose the configuration of filing indicators.
In order to edit filing indicators setup user selects a report in the "Reports" window pane on the righthand side, right-clicks and selects "Choose Filing Indicators...".

In the next steps user can select or deselect tables and configurate filings indicators status.

In order to delete report user selects a report in the "Reports" window pane on the righthand side, right-clicks and selects "Remove report".
Once the report is created, opened or imported from XBRL file, user is able to preview existing data, edit, save, validate, etc.
User can edit the report name, context reference date, entity identifier or currency. In order to edit report user selects a report in the "Reports" window pane on the righthand side, right-clicks and selects "Edit Report...".
Tables can be accessed by expanding tree structure under a selected report.
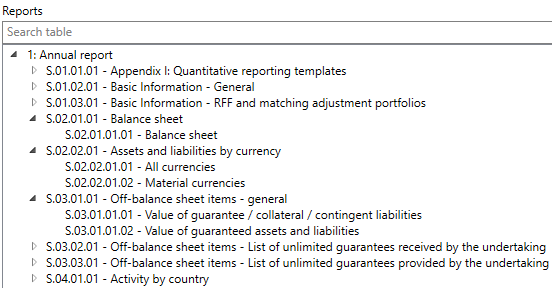
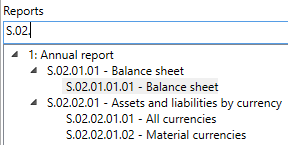
Tables can be filtered by code or name in the "Search table" field.
Double click on a table opens it in the left hand side pane.

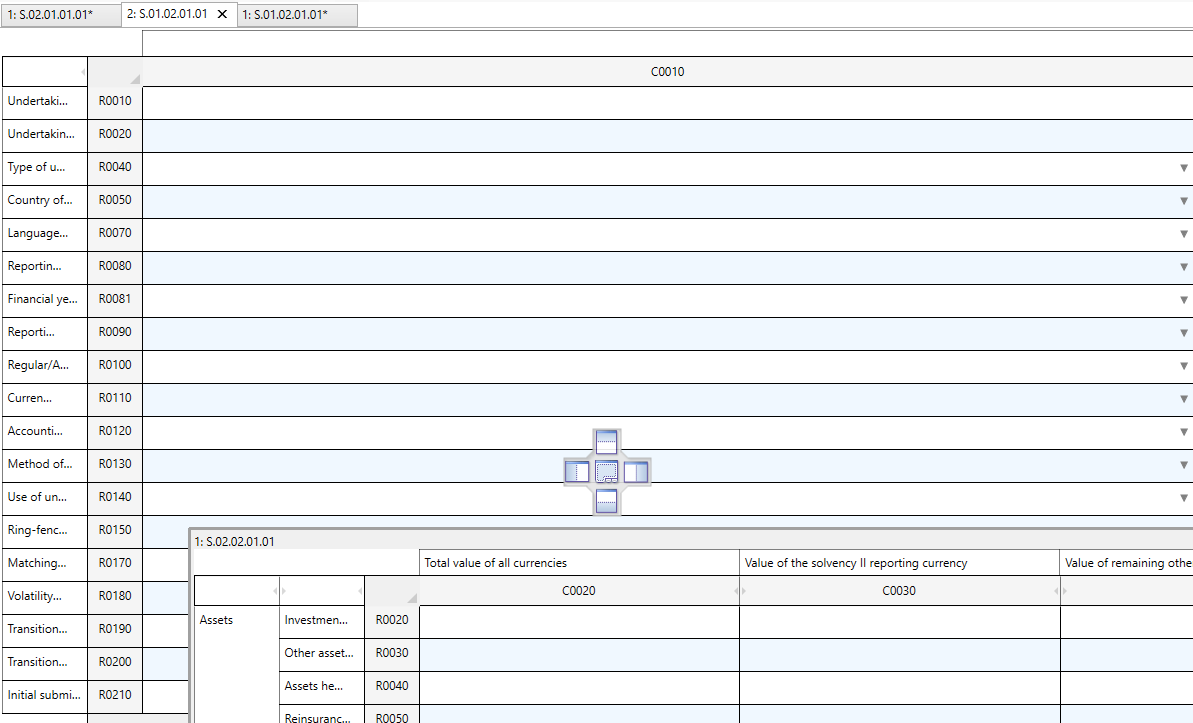
Each opened table results in a new tab in the left hand side windows pane.
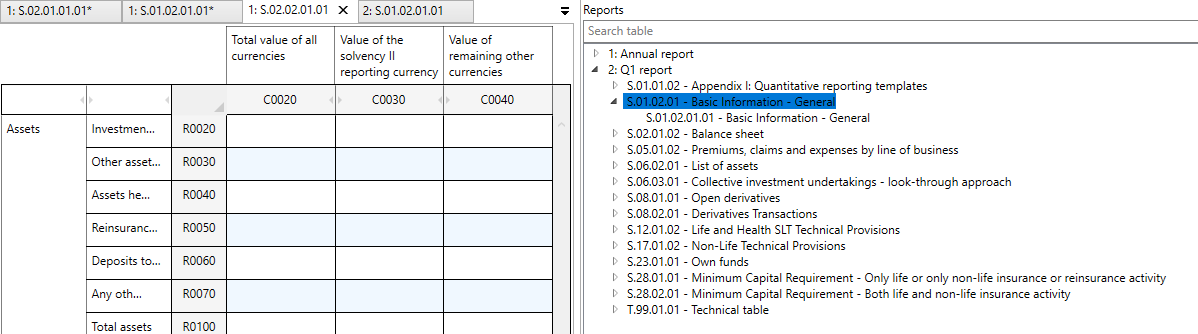
Table code is prefixed by a number identifying a report it belongs to. For example "1: S.02.02.01.01" informs that table comes from report 1 as listed in the "Reports windows pane as in the right hand side while "2: S.01.02.01.01" informs that a table is defined for report 2.
In order to view multiple tables at the same time, user clicks and holds clicked table code in the tab listing all tables and is able to detach a table as a separate window or use the dock panel:
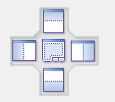
in order to display it next (left-right-top-bottom) to other table.
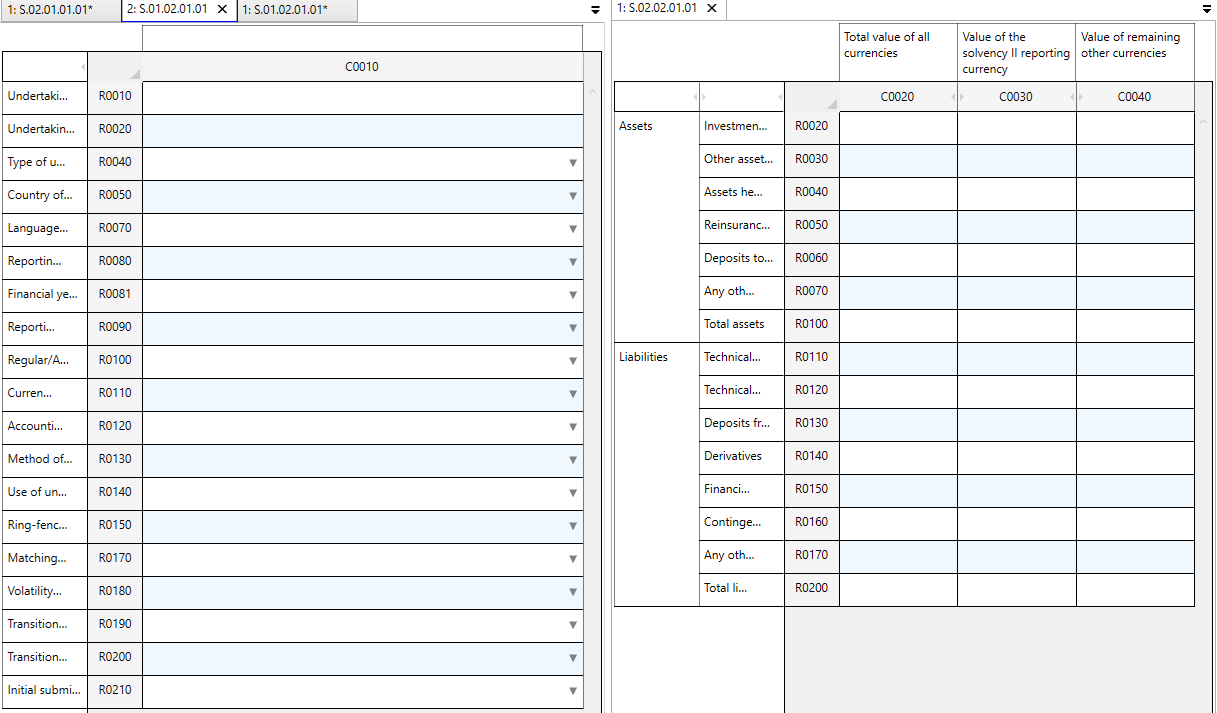
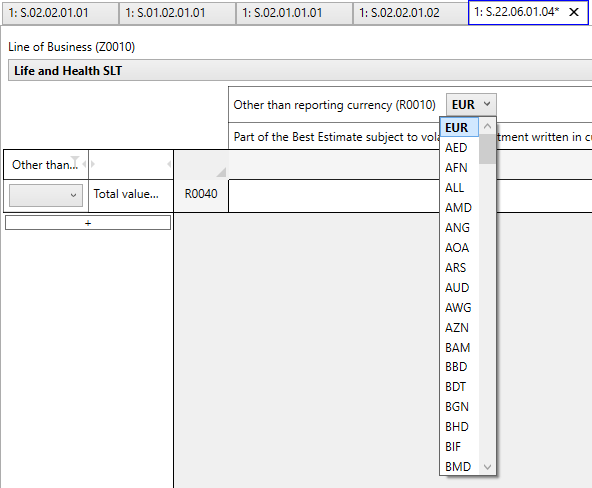
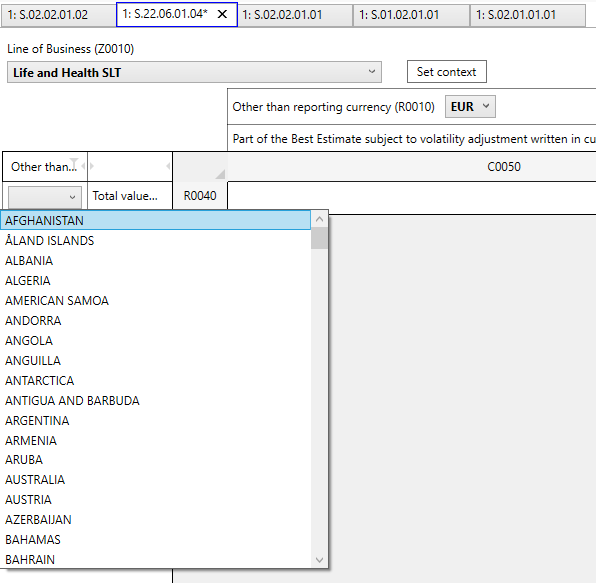
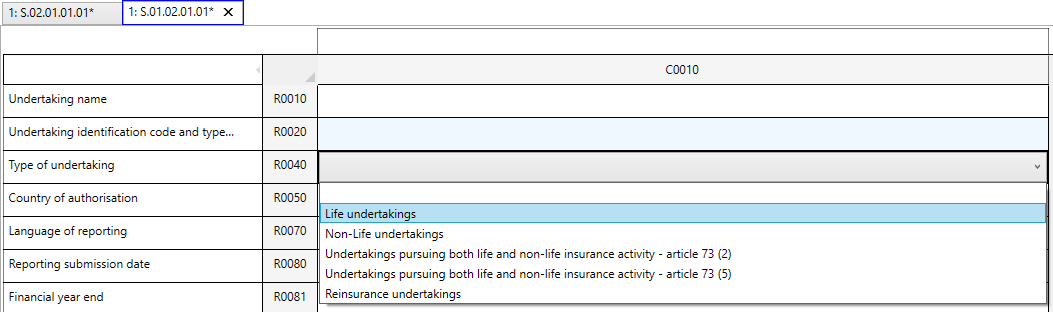
Some tables require context to be set before it is possible to enter data. Context can be defined for entire table, rows or column. To set up context for entire table, user selects values from dropdowns appearing above the table and clicks "Set context".
User can click ![]() icon in the menu bar to remove context for entire table.
To set up context for columns or rows user selects values from dropdowns.
icon in the menu bar to remove context for entire table.
To set up context for columns or rows user selects values from dropdowns.
In order to add more contexts, user clicks on the "+" button on the right hand side to the table columns (or ![]() icon in the menu bar) or "+" button below rows (or
icon in the menu bar) or "+" button below rows (or ![]() icon in the menu bar).
icon in the menu bar).
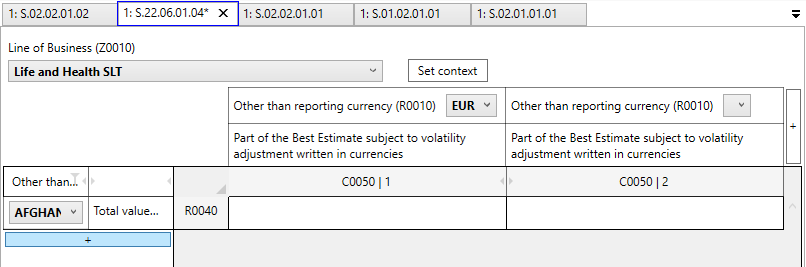
In order to remove last added context, user clicks on ![]() or
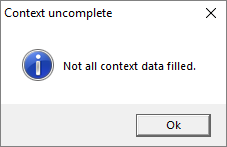
or ![]() icon in the menu bar for columns or row respectively. Data inside the table can be saved only when all contexts are defined. Otherwise, a message is displayed.
icon in the menu bar for columns or row respectively. Data inside the table can be saved only when all contexts are defined. Otherwise, a message is displayed.
In case values for a context are not prescribed in the model, user can edit the values by selecting "Manage values…".

New value can be added by clicking on "+" and then typing the value matching the identified format.
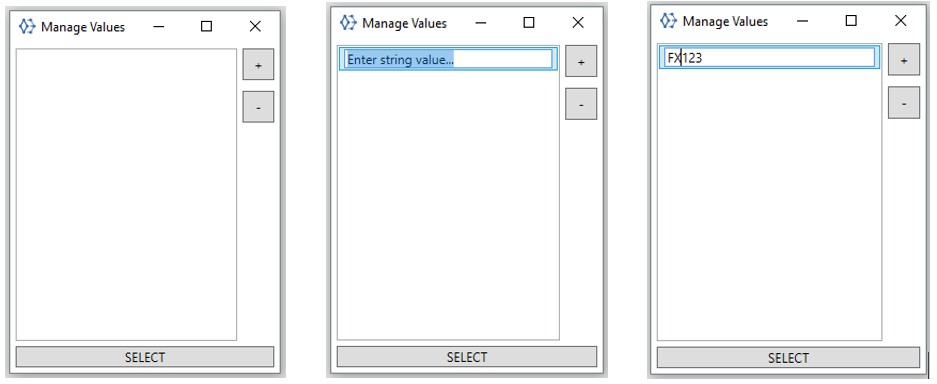
User can select defined values from the dropdown.

Context must be also set up in case of open tables. In this case user provides values in key columns.
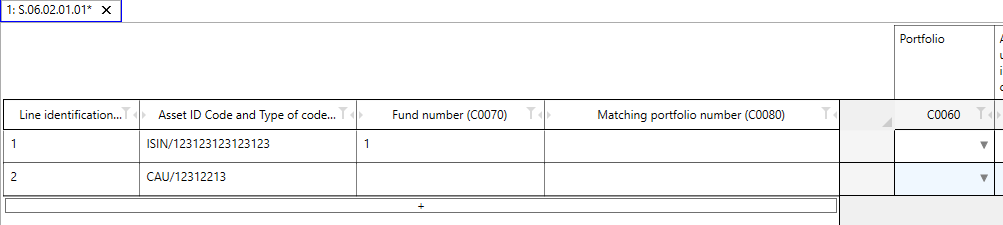
In order to add more rows user can select "+" button below the existing rows.
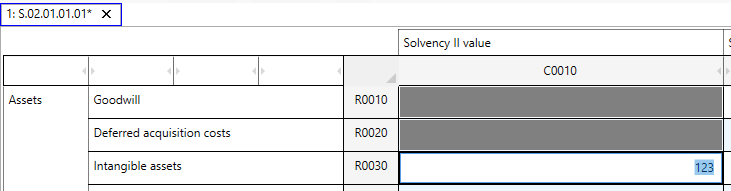
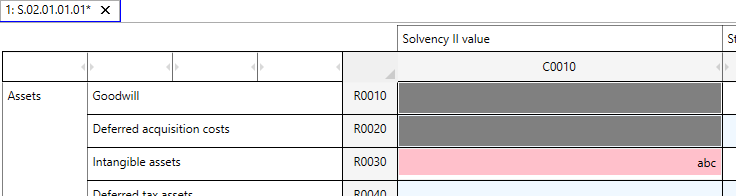
Data in tables can be edited by clicking on a cell and typing a value.
If data entered does not match the required format cell is coloured in pink.
Dropdowns are listed as cell values.
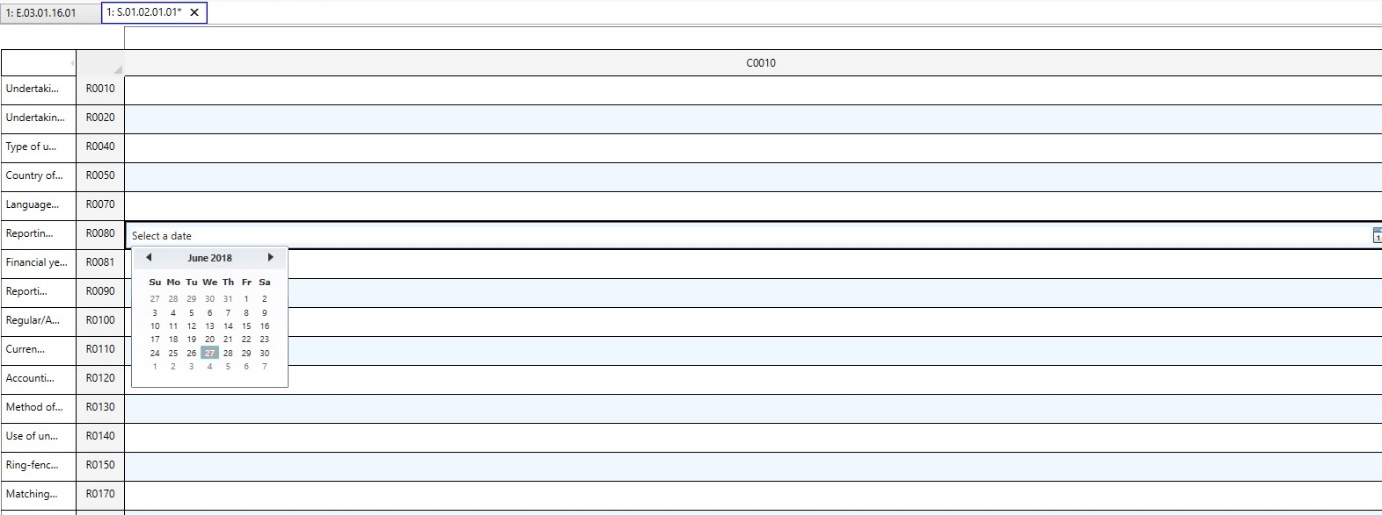
Dates can be selected from a calendar.
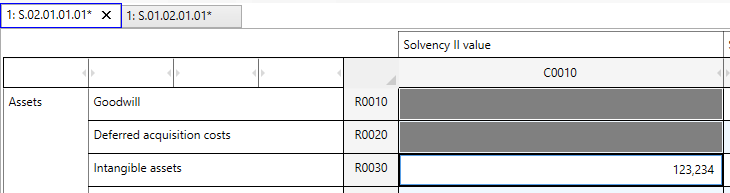
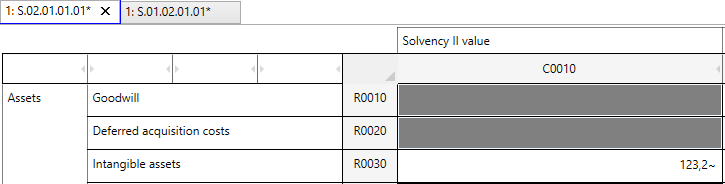
Numeric values with higher number of decimals are rounded for displaying purposes.
For performance reasons, displaying data in open tables is limited to a selected number of rows. This number is by default set to 50 and can be modified in the menu bar.
![]()
For this purpose, the user should:
To ensure the most optimal use of the software, we recommend displaying 50 rows at the same time.
ATOME: Particles brings support for multi-currency functionality. Users are able to use a new user interface feature ("Cell Properties" in the left side of the tables) to set the currency for appropriate cells. If the currency value is not set, the default one will be used in XBRL export and import.
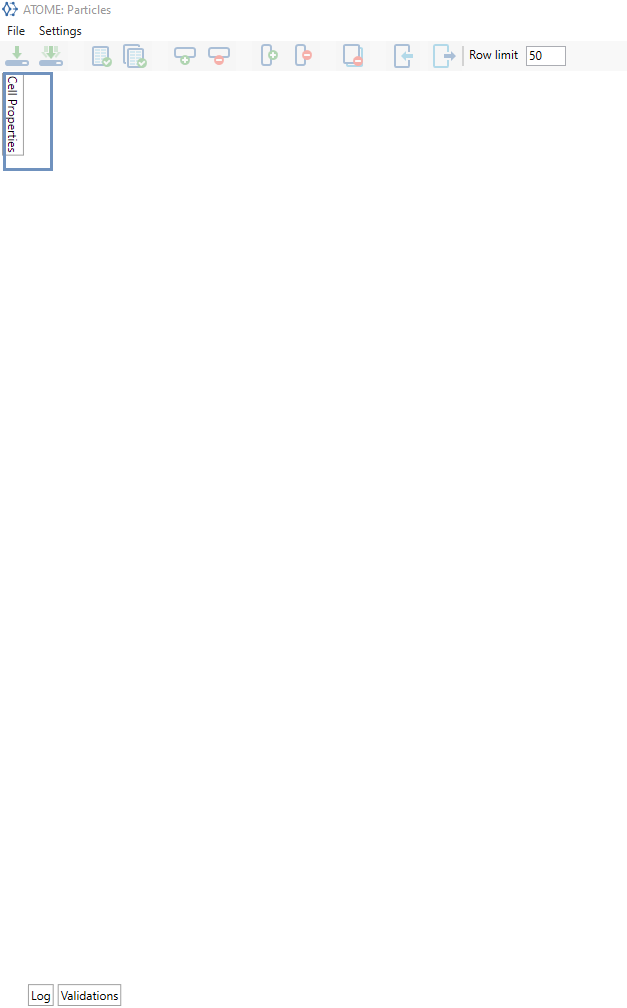
In this part of the application, the user can set the currency for a specific cell or after selecting more than one cell for the whole group.
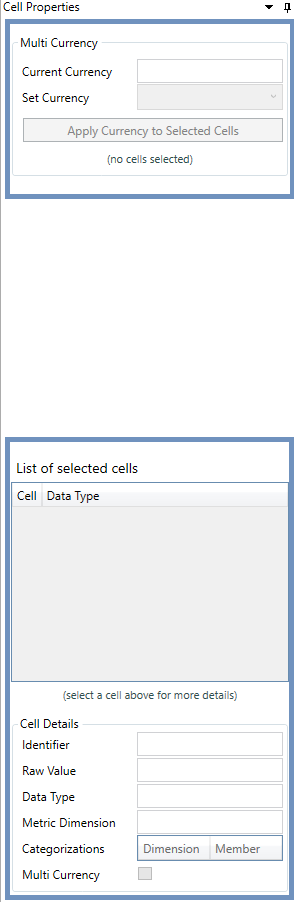
If the user enters some data to the cell, a dedicated box will be automatically filled in by the data like: identifier, raw value, data type, metric dimension.

For the simplicity of the usage, ATOME: Particles inform if the cell supports multi-currency. In this purpose the user must select one or more cells.
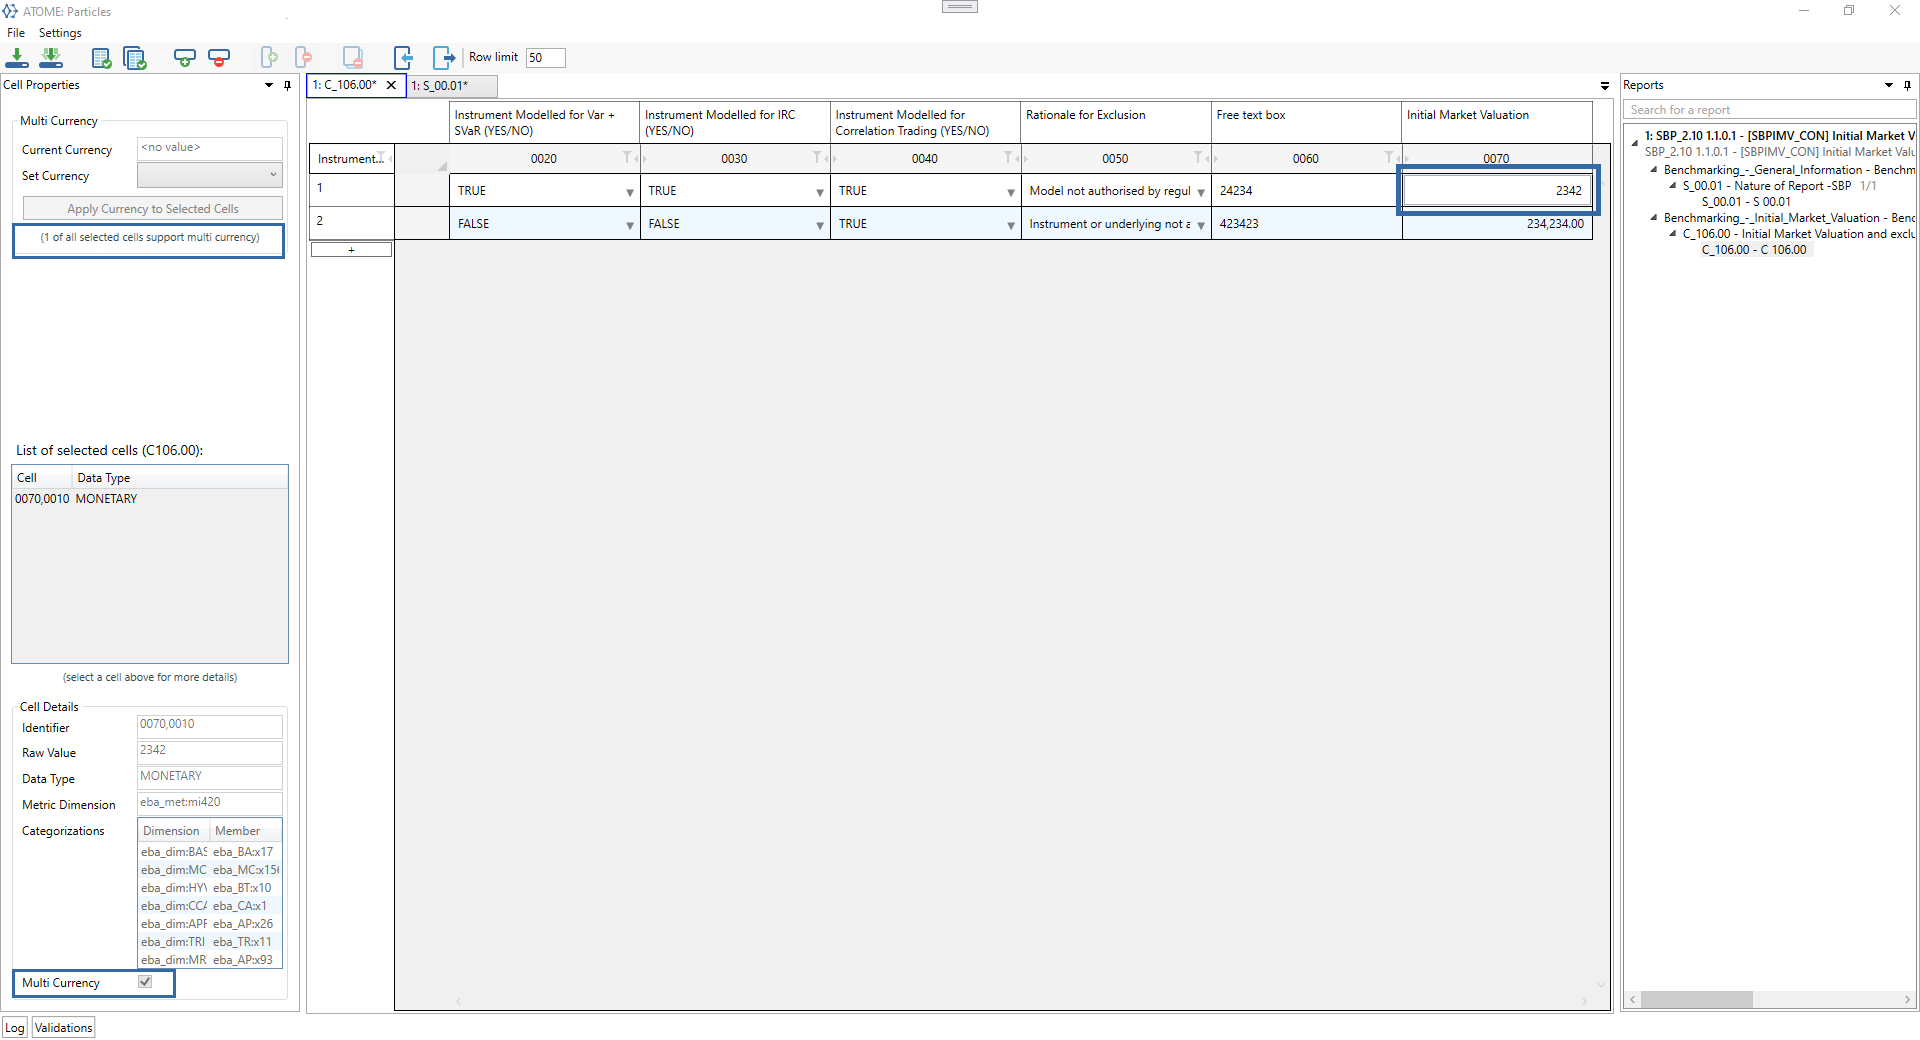
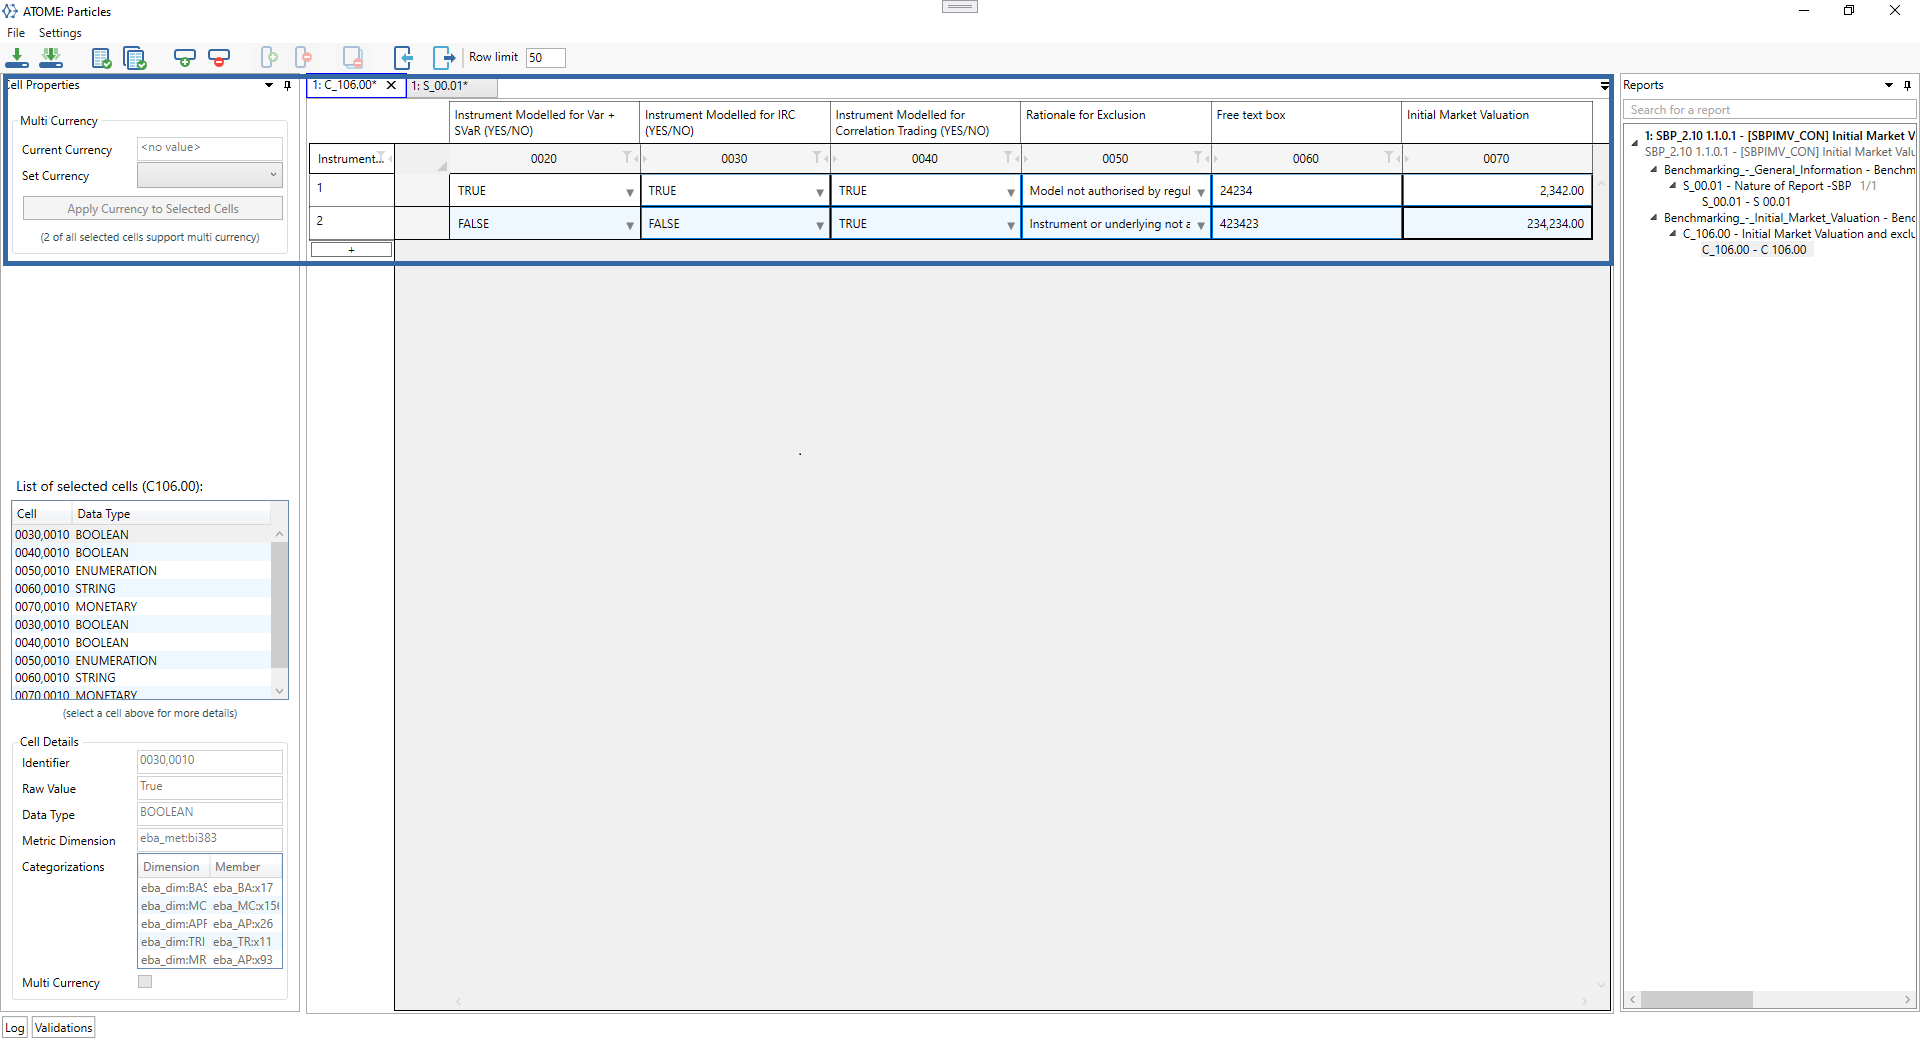
To change the currency for the data in the cell, the user must select the cell and from the available list set the currency.
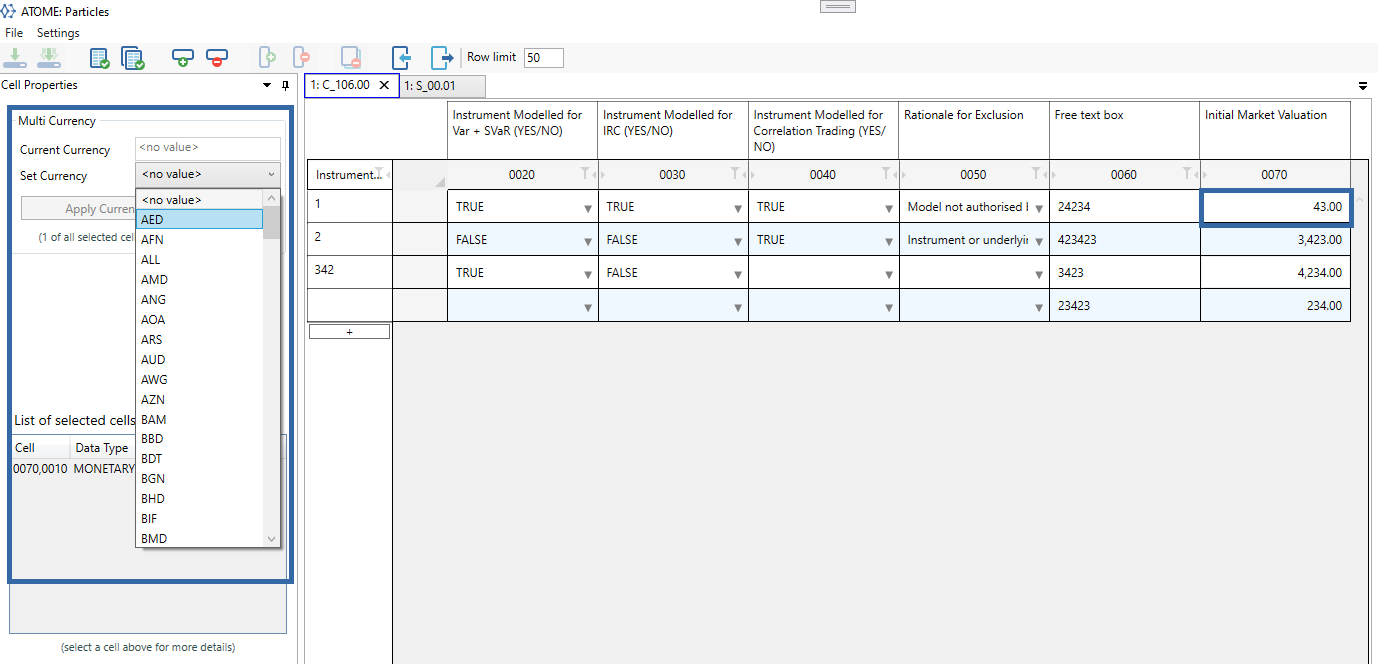
Each time when the user select a currency, must confirm the choice by clicking the button: "Apply currency to selected cell".
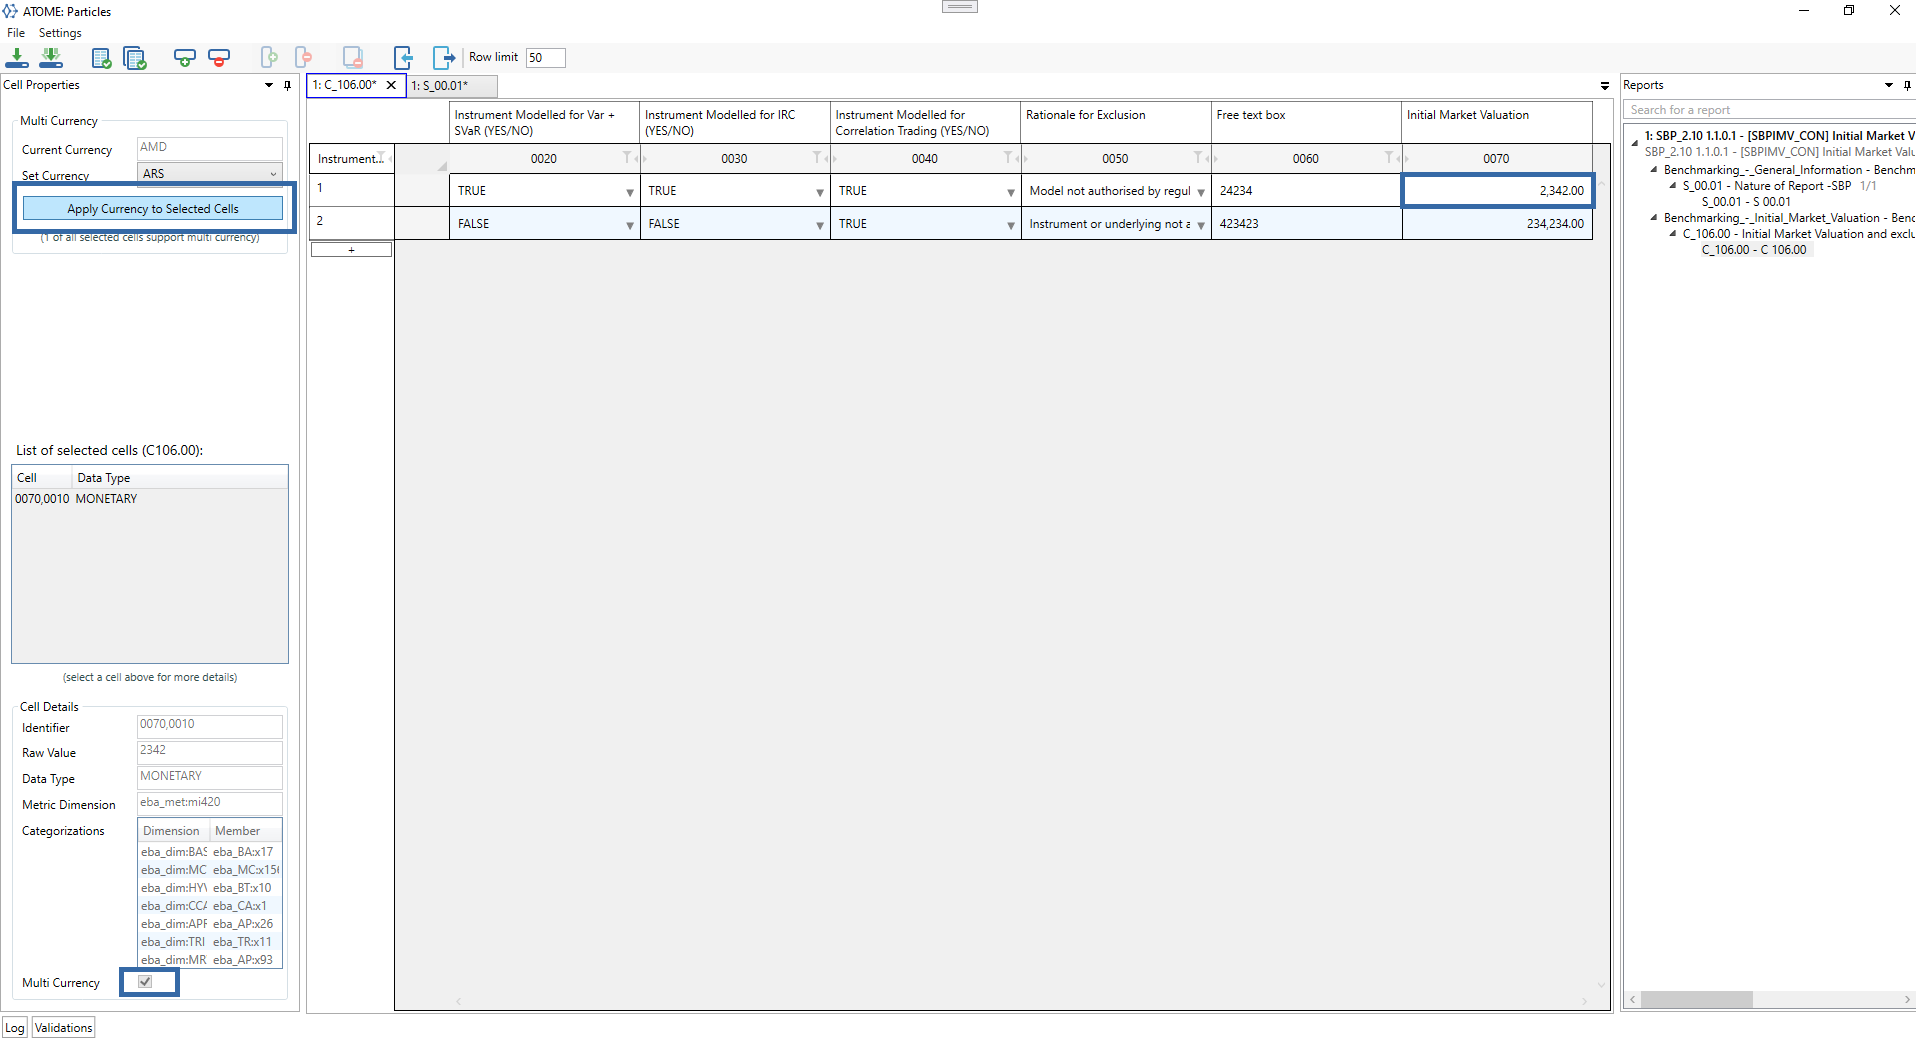
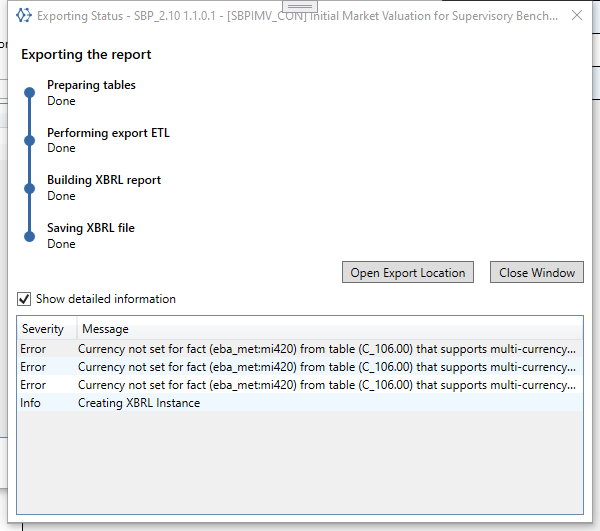
When exporting to XBRL a report that is supporting multi-currency and doesn't have a currency set, the report currency of the report will be used, and a message will be shown to the user pointing to the particular fact and table
User is able to apply filters on data in columns of open tables. This can be done by right-clicking on the filer icon next to column code, e.g. ![]()
The type of filter to be applied depends on the content of a column (numeric, text, date, etc.).

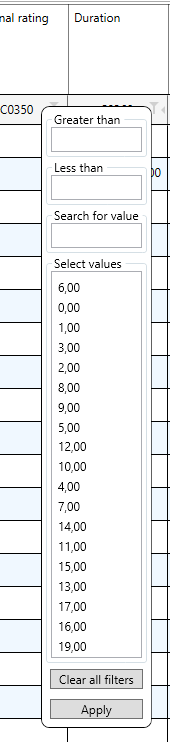

Data is filtered for all rows in a table, regardless of the row limit set for display purposes.
Tables with unsaved changes contain asterisk (*) next to table code.
![]()
User can save individual table or all tables at once by clicking on ![]() or
or ![]() icons in the menu bar respectively.
icons in the menu bar respectively.
During export and import to visual excel, in the case of multi-currency cells, the information about the changed currency will not be saved in the report.
User can import data from Excel and export data to Excel. Structure of excel file follows one of two supported formats: Technical Excel and Visual Excel.
User can import data from Excel to a new report by selecting a report:

In the next step the user has a possibility to select: module of report, Context reference date, Entity Identifier and Currency.
In this step user can add a new Entity Identifier. For this purpose, the user should click on the "Manage Identifiers ..." button.
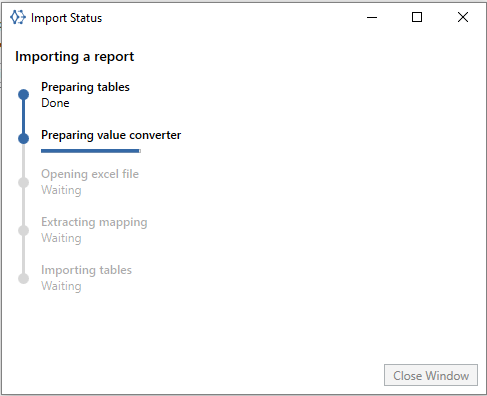
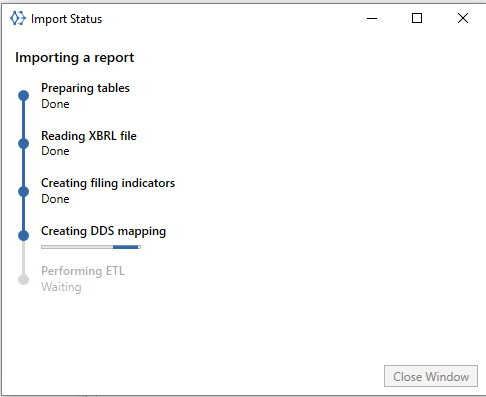
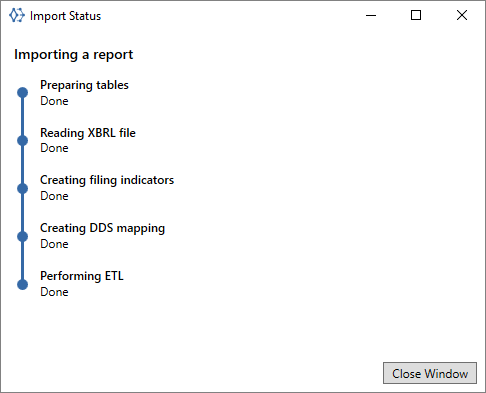
After selecting table or tables group that should be included the "Window of Import Status" will be displayed.
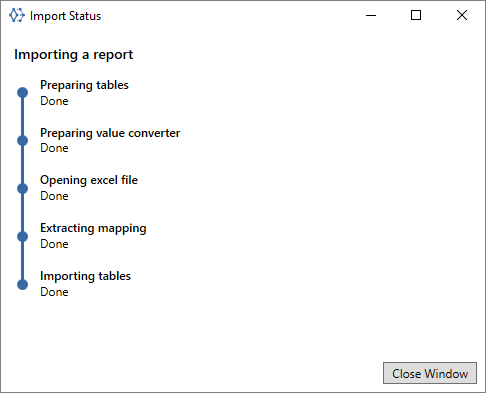
Imported reports will be displayed in the "Reports" window pane on the right hand side.
When data is imported user is able to edit it as described in section Editing data in table cells.
Next steps as in the import described above.
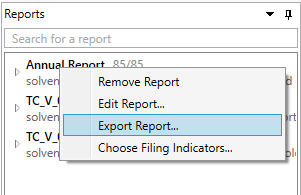
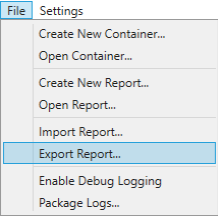
User can export data from an existing report to Excel:
By selecting a report in the "Reports" window pane on the right hand side and selecting "Export report..." in next step choosing to "Technical Excel" or "Visual Excel".
By selecting a report from Export Report Wizard window after pressing Export Icon ![]() and following the instructions.
and following the instructions.

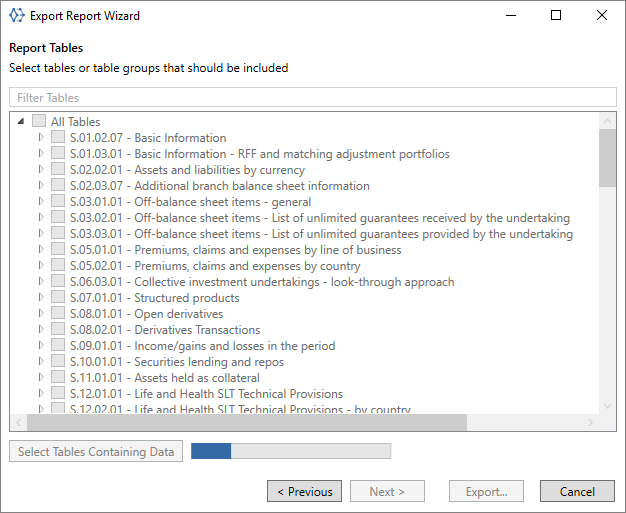
Atome: Particles give the possibility to select only tables containing data. In this purpose the user should to press dedicated button.
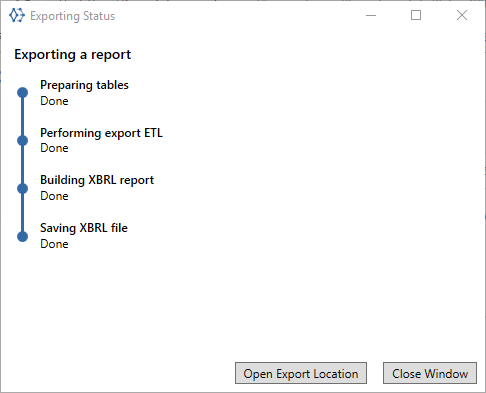
As in Import process "Exporting Status" is displayed in new Window with the specified steps.
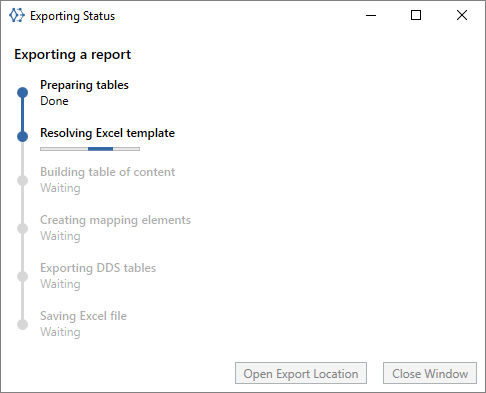
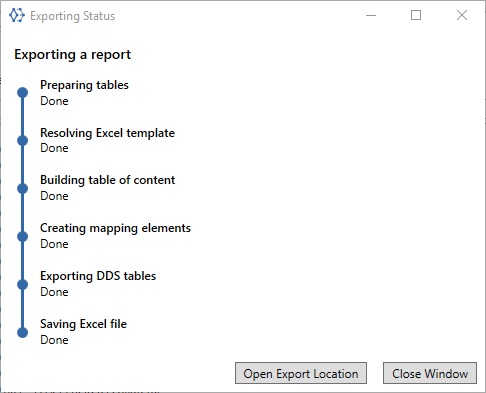
From this window, the user has a possibility to open export location.
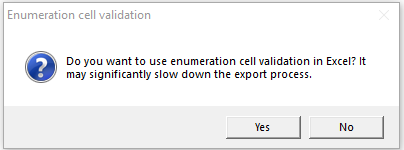
Reports containing large amount of data may be time consuming when exporting to Excel. User can accelerate the process by excluding from the output validation of enumeration cells.
Excel file is created in the indicated location.
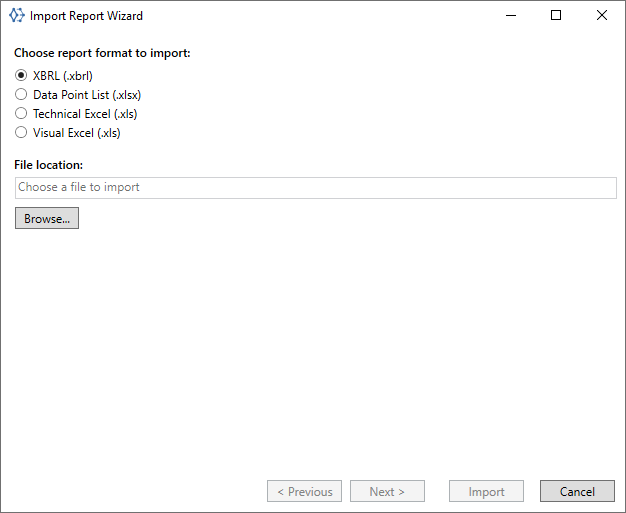
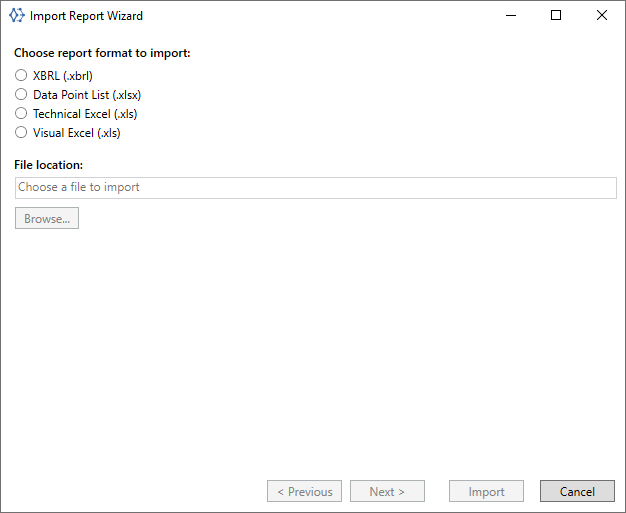
User can import data from XBRL instance documents and export data to XBRL instance documents.
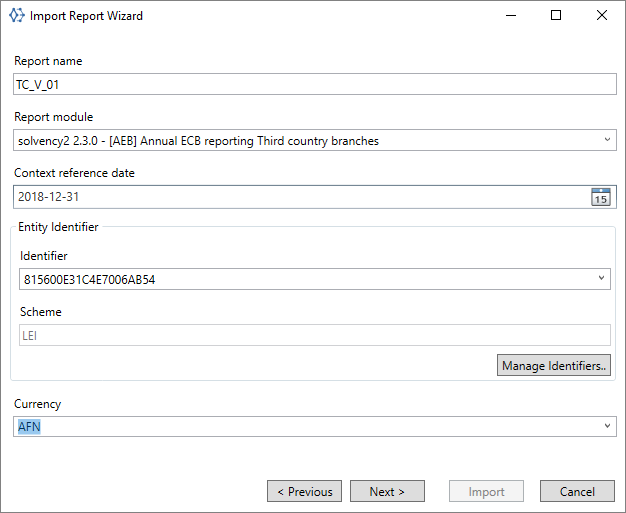
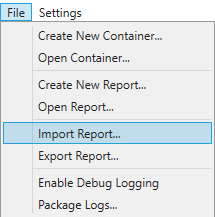
User can import data from XBRL instance document by selecting "File" => "Import report..." from menu bar or pressing import icon ![]() on the icon bar
on the icon bar
![]()
and following the instructions.
Report currency is automatically set up based on the content of the instance document but can be modified in case of multicurrency reporting.
User can import XBRL reports without entities defined in settings (see section Defining reporting entities). In case XBRL report contains data for an entity which is not listed in settings the application will display information about the possibility of adding this Entity Identifier and Scheme.
Imported reports will be displayed in the "Reports" window pane on the right hand side.

Report information can be edited as described in section Edition of data. Data can be edited as described in section Editing data in table cells.
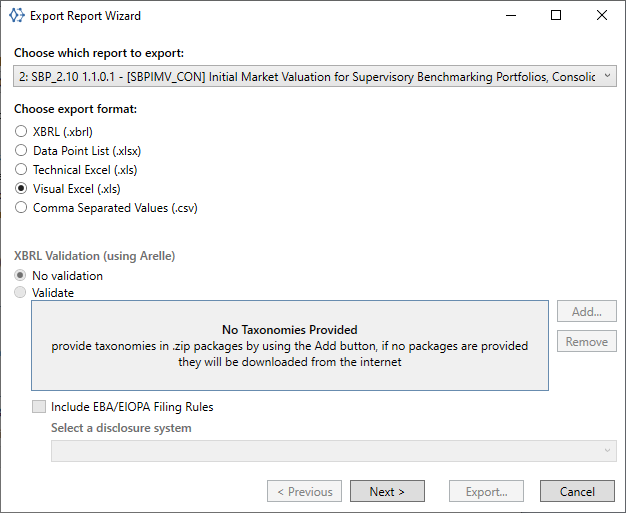
The User can export data from an existing report to XBRL:
by selecting the report in the "Reports" pane on the right and selecting "Export report ..." in the next step choosing the XBRL format and following the instructions,
by selecting a report from Export Report Wizard window after pressing Export Icon ![]() and following the instructions.
and following the instructions.
Atome: Particles gives the possibility to select only tables containing data. In this purpose the user should to press dedicated button.
As in Import process Exporting Status is displayed in new Window with the specified steps.
From this window, the user has a possibility to open export location.
XBRL file is created in the indicated location.
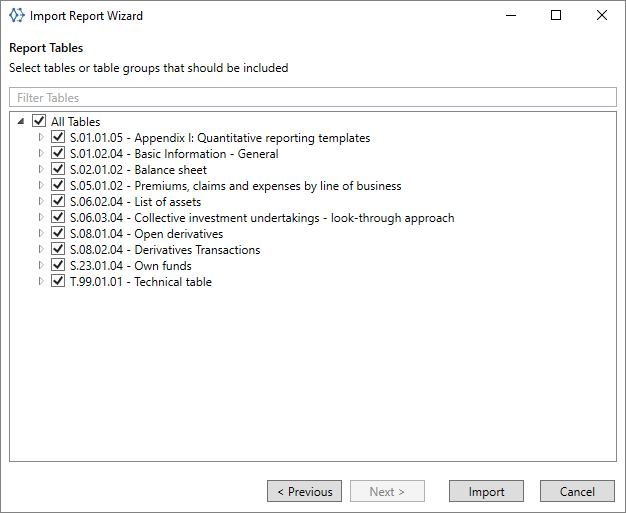
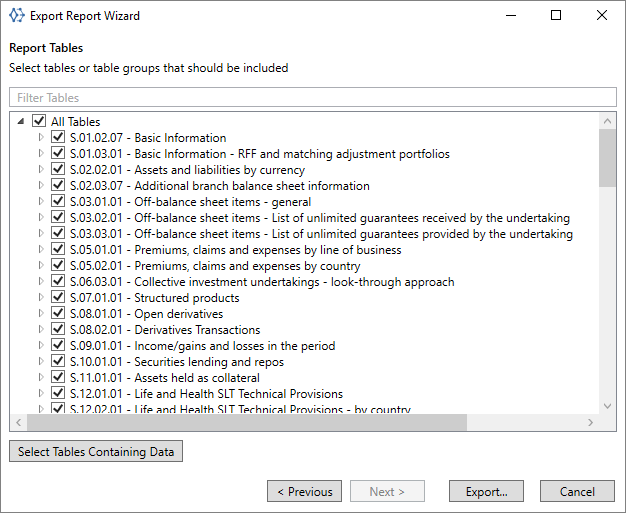
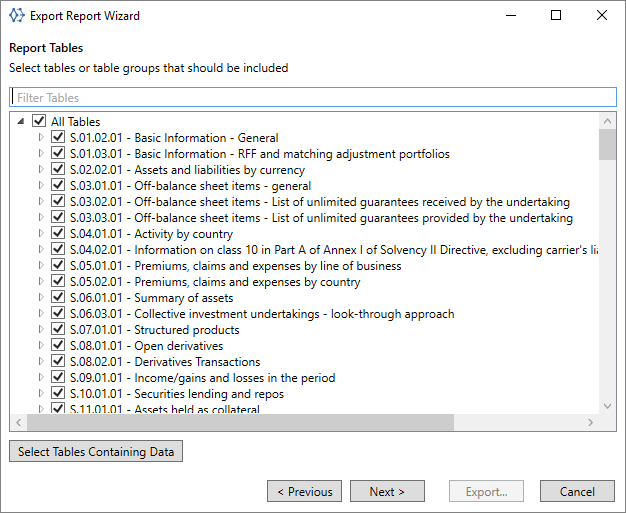
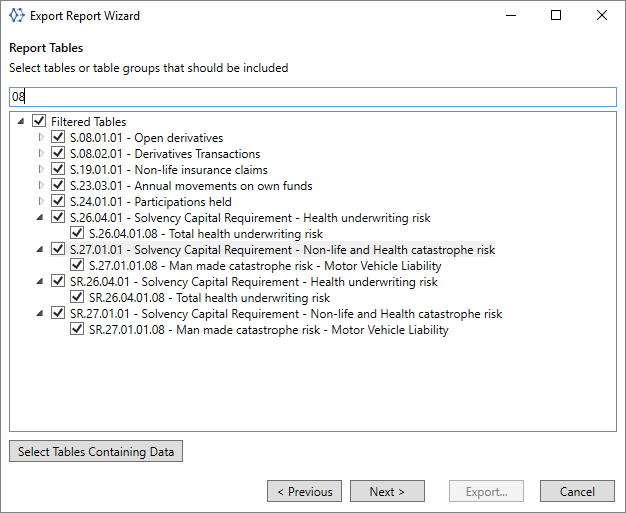
In this step the User can select tables or table group that should be included. The filtering allows easily select or deselect some part of tables.
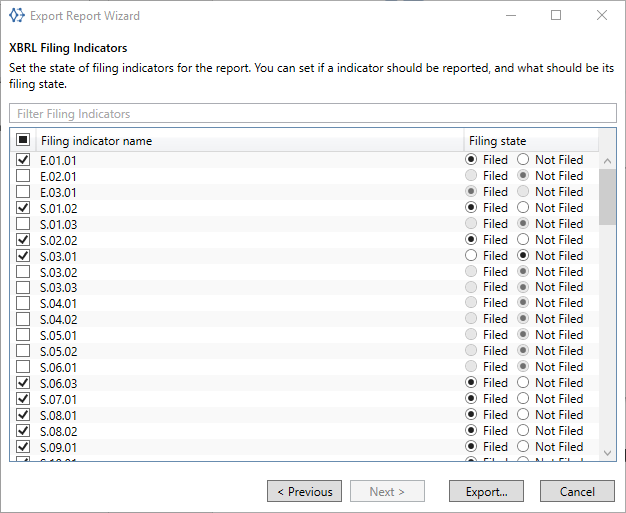
Filing Indicator state is automatically taken from the report. The user can change the state manually before the export or set the state of filling indicators for the report beforehand. To do this, the user must choose from the context menu in the "Report List" on right hand side => "Choose Filing Indicators...". Menu is displayed after pressing right mouse button on the report name.
After selecting the path to savening XBRL file, exporting status will be displayed.
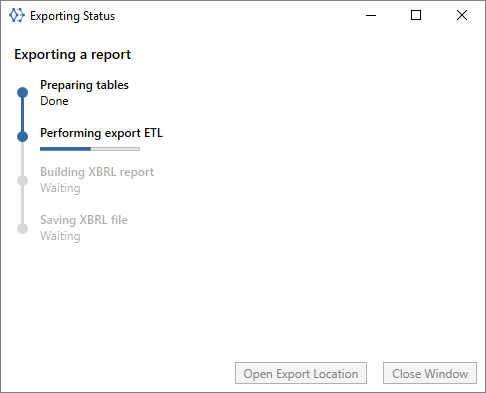
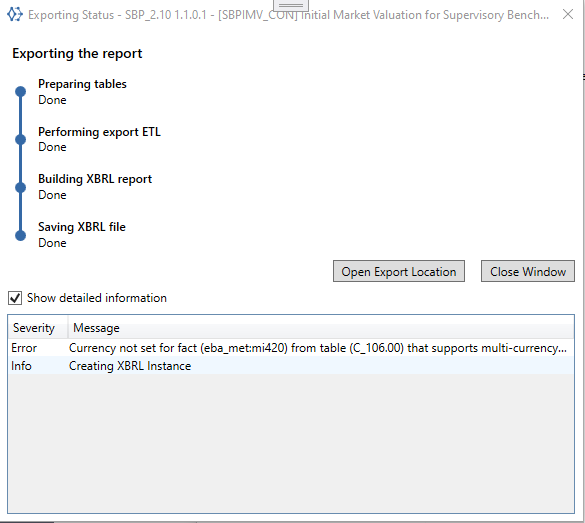
If during the export or import some error or warnings will occur the message will be automatically shown for the user.
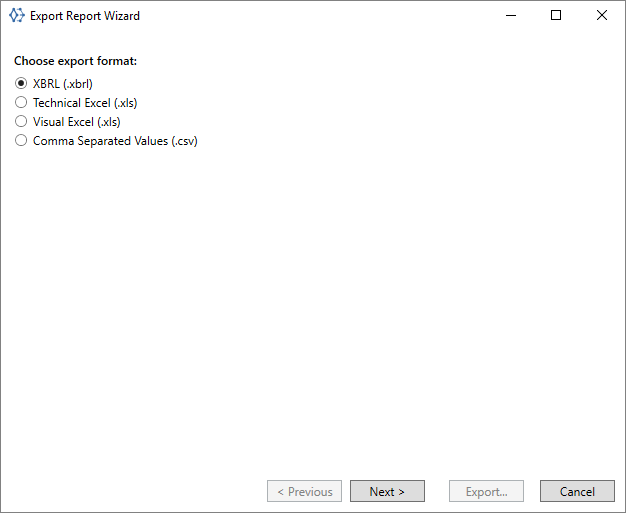
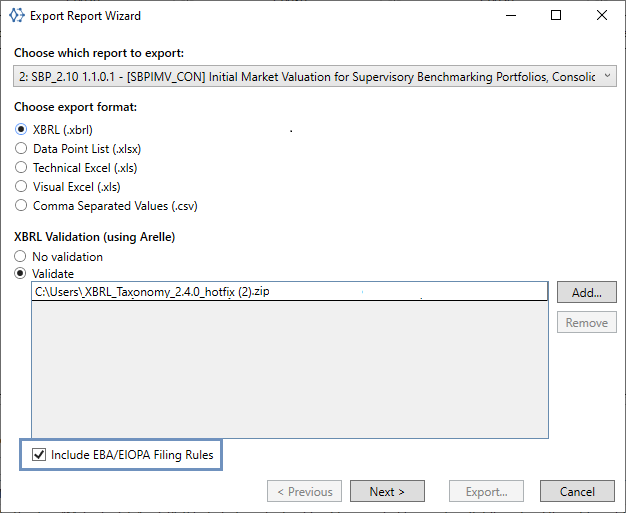
ATOME: Particles allows the user to validate the report using the Arelle tool (more about the Arelle https://arelle.org). To select this option the user should select => "Export Report" (see section Export to XBRL.)
After choosing: Export to XBRL, the option: Validate using Arelle is activated. The user can select:
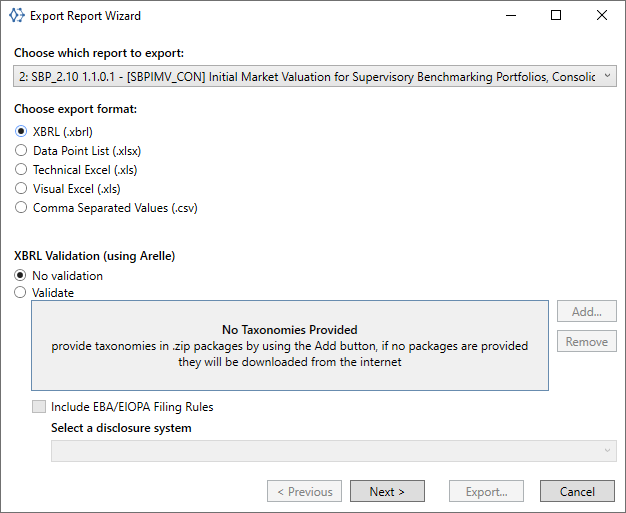
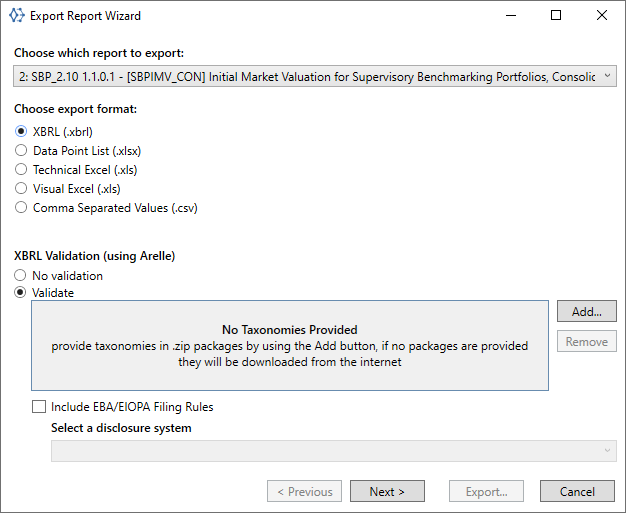
User can include additional EBA/EIOPA Filing Rules.
If the user enables validation by Arelle tool, additional steps will appear in the export progress window. There also appears a option to View Arelle Results.
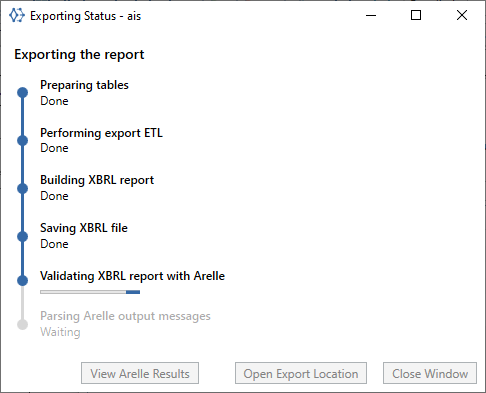
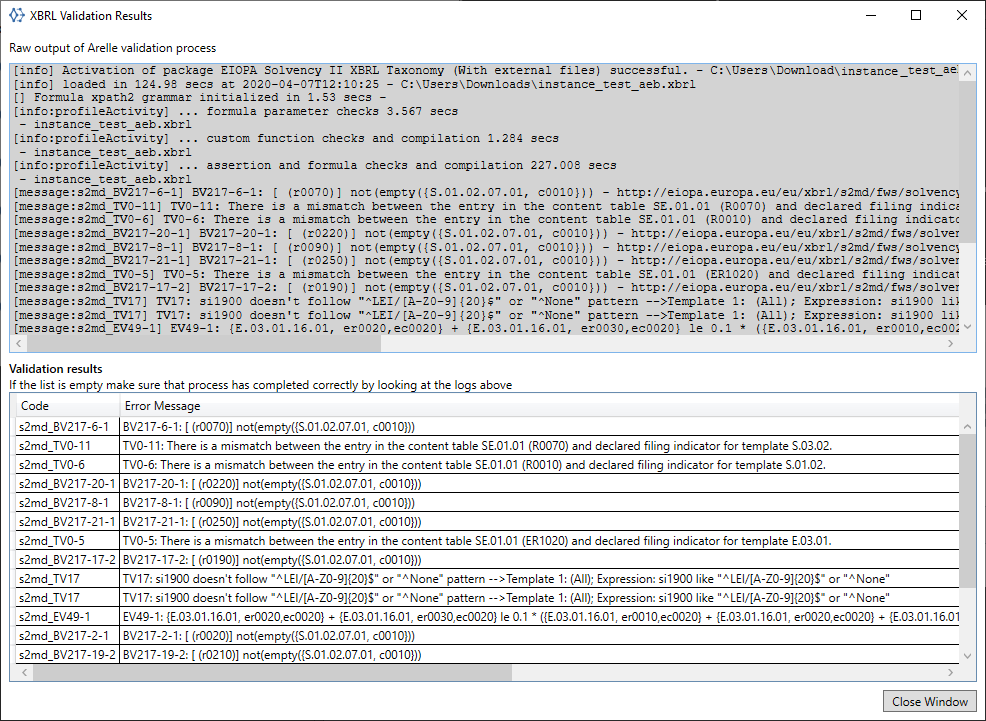
To view the results of validations performed by the Arelle tool, the user should select => "View Arelle Results". The results will be displayed in the new window and the user can copy them using keyboard shortcuts Ctrl+A (to select all) and Ctrl+C (to copy).
To remove packages the user should select the package, and press "Remove" button.
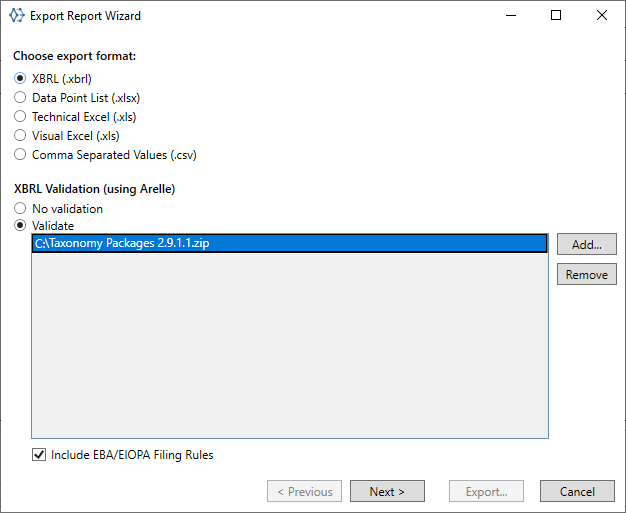
If the user selects other type of export the part of the window with validation by Arelle will be inactive.

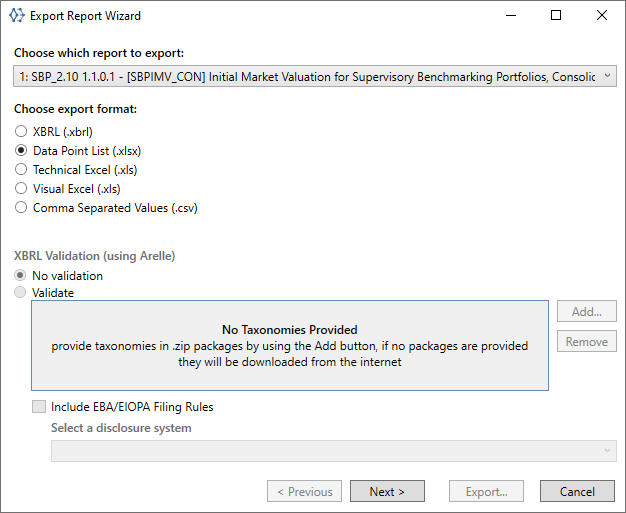
Datapoint List (DPL) is a type of export that exports to an Excel file. User can import data from DPL (.xlsx) instance documents and export data to DPL instance documents (.xlsx).
The resulting file (*.xlsx) contains two sheets:
Properties - with information about the report like module, repPorting date, currency.
Datapoint - where are the data from the report, always in eight named columns (table, row, column…) and written row by row. As the export only exports the data (not the structure of the report as regular excel exports) the size of this sheet is proportional to the amount of reported data inside.
User can import data from DPL (.xlsx) instance document by selecting "File" => "Import report..." from menu bar or pressing import icon ![]() on the icon bar.
on the icon bar.
![]()
and following the instructions.

Report currency is automatically set up based on the content of the instance document but can be modified in case of multicurrency reporting.

User can import DPL reports without entities defined in settings (see section Defining reporting entities). In case the DPL report contains data for an entity that is not listed in settings the user can add that information directly from the Window: Import Report Wizar by clicking "Manage Identifiers".
Imported reports will be displayed in the "Reports" window pane on the right hand side.
Report information can be edited as described in section Edition of data. Data can be edited as described in section Editing data in table cells.
The User can export data from an existing report to DPL (.xslx):
by selecting the report in the "Reports" pane on the right and selecting "Export report ..." in the next step choosing the DPL format and following the instructions,
by selecting a report from Export Report Wizard window after pressing Export Icon ![]() and following the instructions.
and following the instructions.
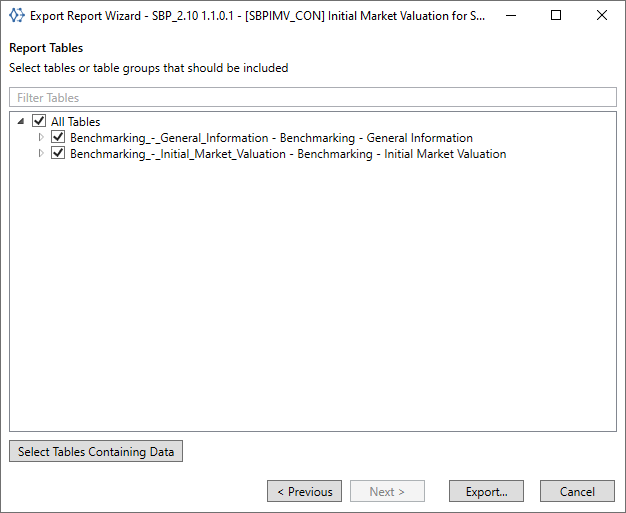
Atome: Particles gives the possibility to select only tables containing data. In this purpose the user should to press dedicated button.
As in Import process Exporting Status is displayed in new Window with the specified steps.
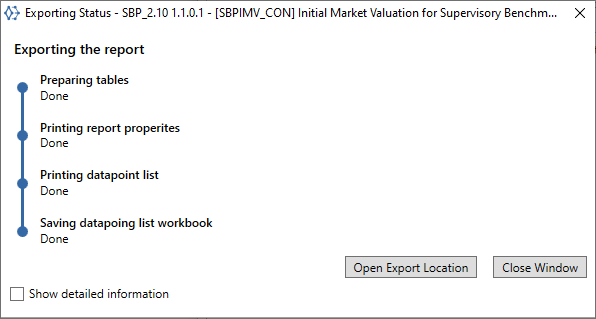

From this window, the user has a possibility to open export location.
If during the export or import some error or warnings will occur the message will be automatically shown for the user.
User is able to validate data for a table or entire report by clicking on ![]() or
or ![]() icons respectively.
icons respectively.
When executed, validation results are displayed in the lower part of the application window or can be accessed by clicking on "Validations" tab in the bottom left-hand side corner.
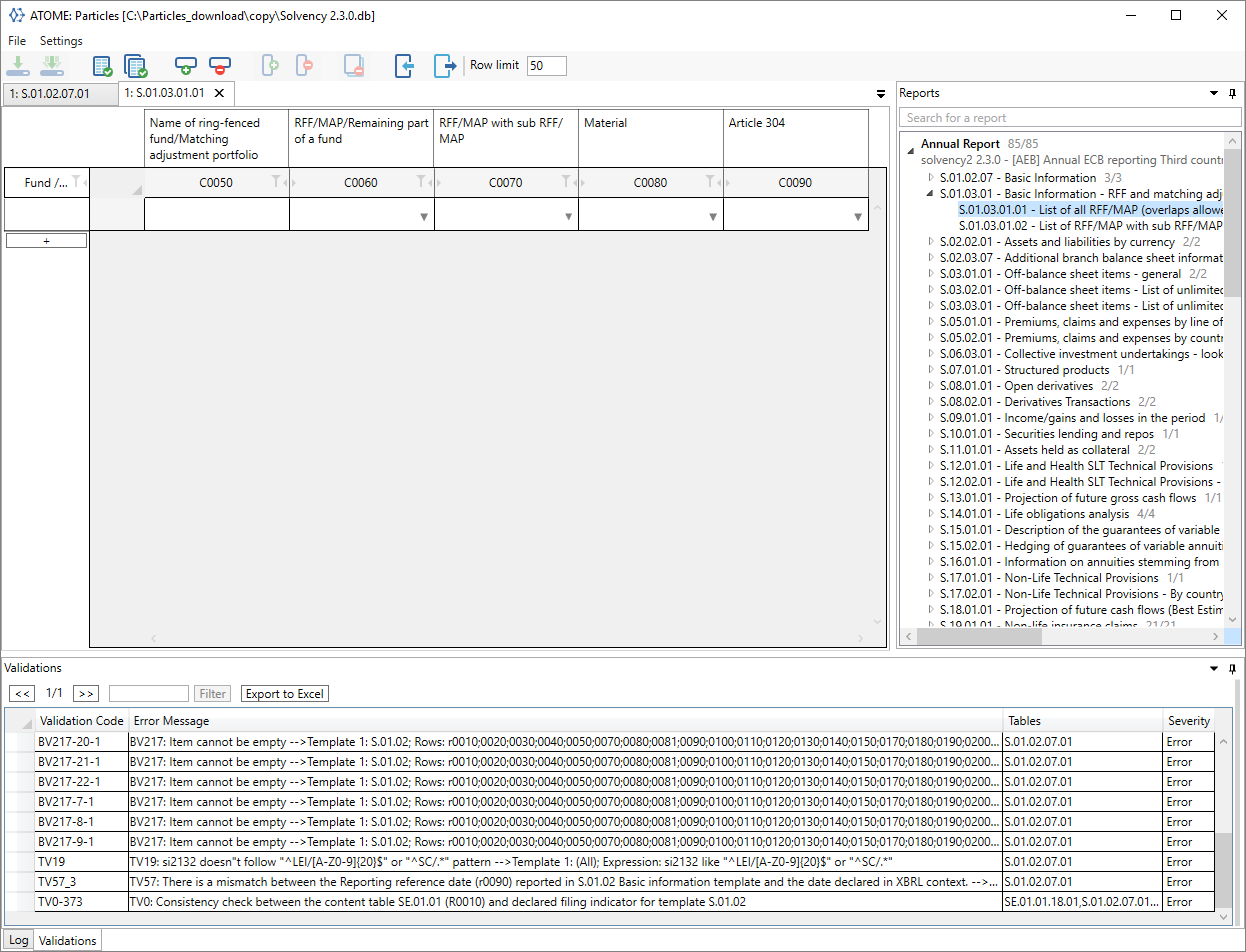
When clicking on a validation, the application will highlight and open affected tables, highlight affected cells and provide summary of the validation (formula, left hand side value, right hand side value, difference between left and right hand side error message, etc).
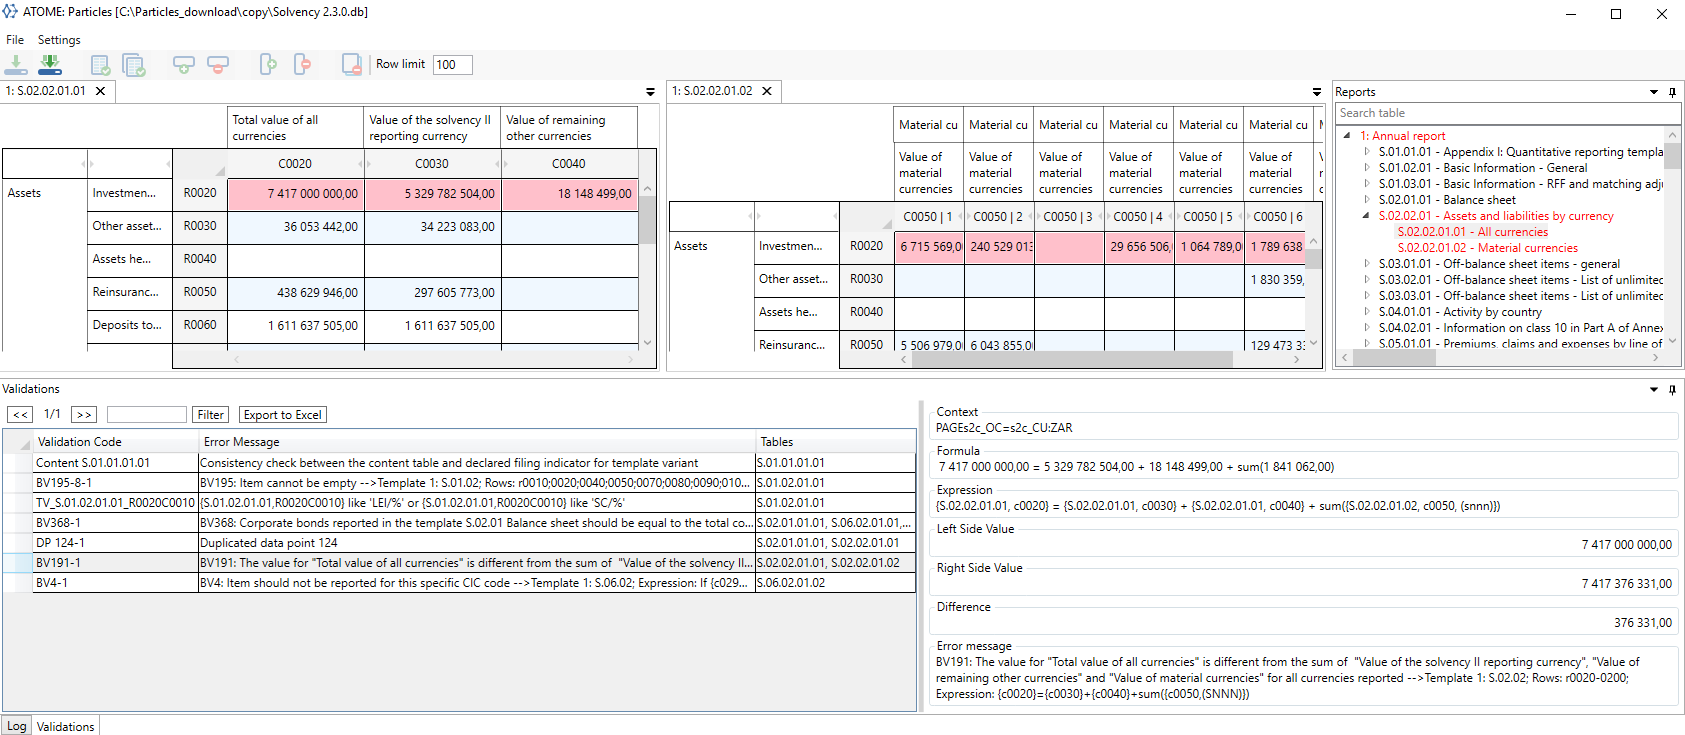
Validation can be filtered based on the rule code.
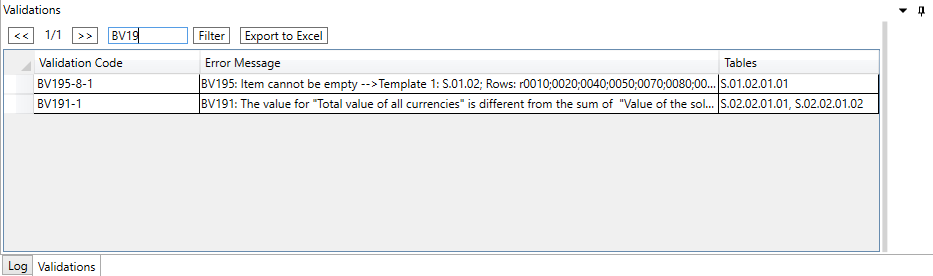
Validations result can be exported to Excel by clicking on "Export to Excel" and identifying the file to store the outcome.
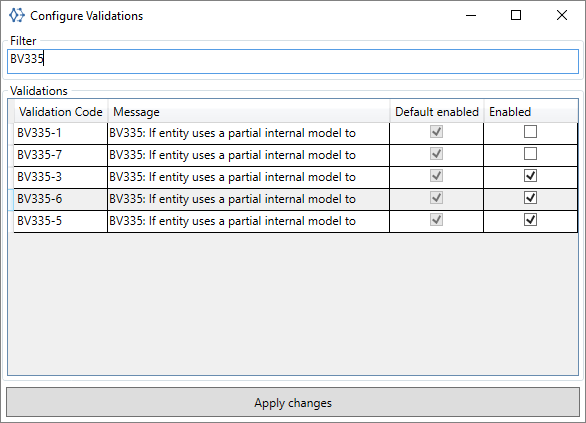
Deactivated validations can be disabled by clicking in "Settings" => "Validations".
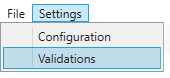
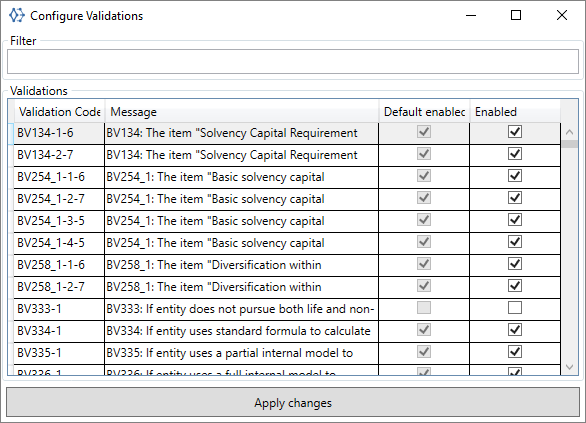
The User is able to filter and select validations to be disabled.
Migration of data may be necessary in case there are changes in master container defining the model and storing data. In such case users are informed when trying to open a container in a new version of the application operating on new master container.
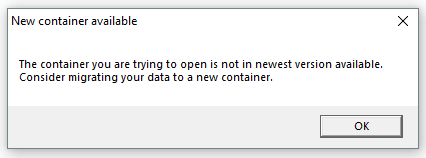
Currently automatic migration is not supported. Users are advised to export data to XBRL/Excel using previous version of the tool and import it to a new version.
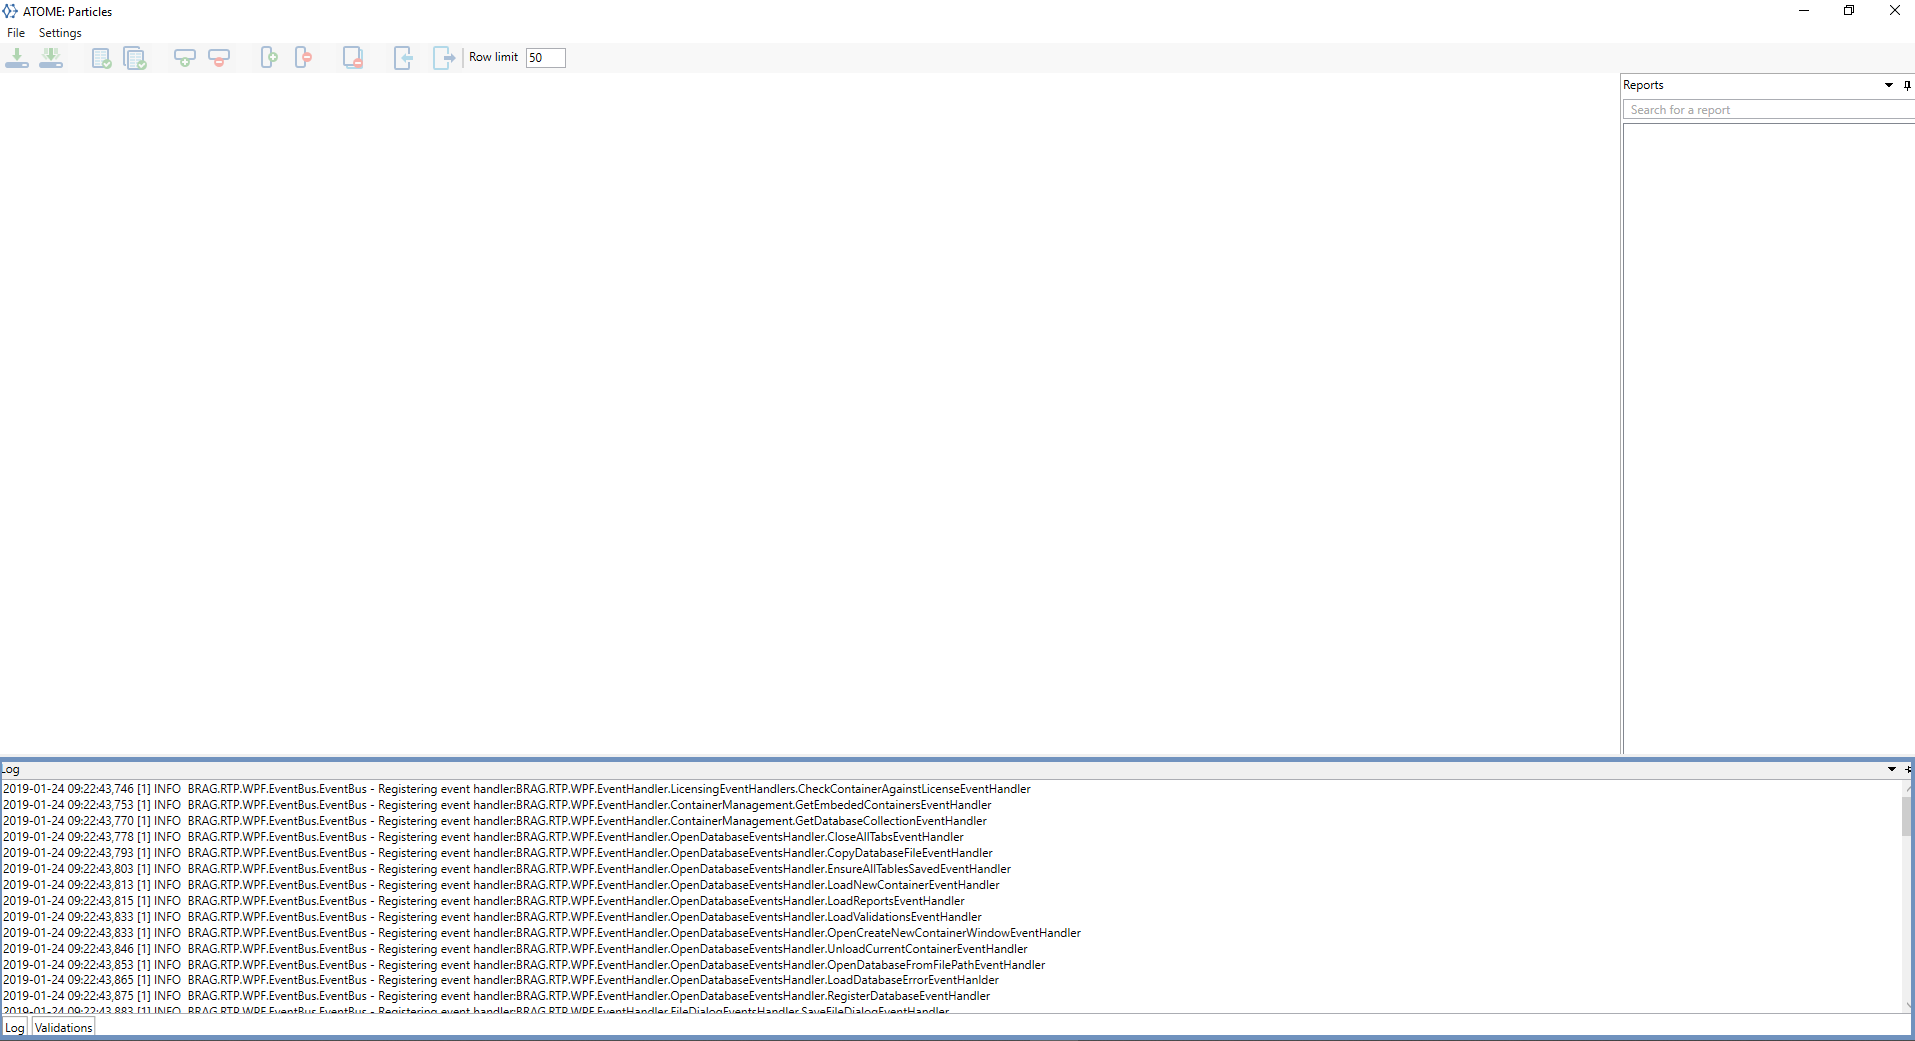
User can preview the log of events by clicking on "Log" button in the bottom left hand side corner of the application window.
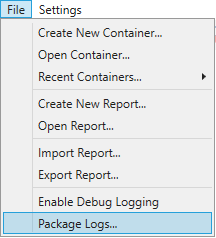
User can pack the logs directly from the application. For this purpose, user should choose from main menu: "File/Package Logs..."/
In the next step the user will have to indicate the path to save the logs. The logs will be packed to .zip file. If for any reason user can't access the 'pack logs' functionality, user should try extracting the logs from ATOME: Particles installation folder. Log of events are stored as a set of files, which can be found in the {Particles installation folder]/Logs

The latest log file is Log.log